


Campaign Setup and Management
- All Keywords
- All Campaigns
- Step 1 - Create a campaign
- Step 2 - Set Placement Inclusion
- Step 3 - Add Bid Multipliers
- Step 4 - Create Ad Groups
- Step 4 (cont) - Add Items to an Ad Group
- Step 5 - Add and Select Keywords
- Suggested Bids
All Keywords
This article provides an overview of the All Keywords page and how to navigate and use this feature.
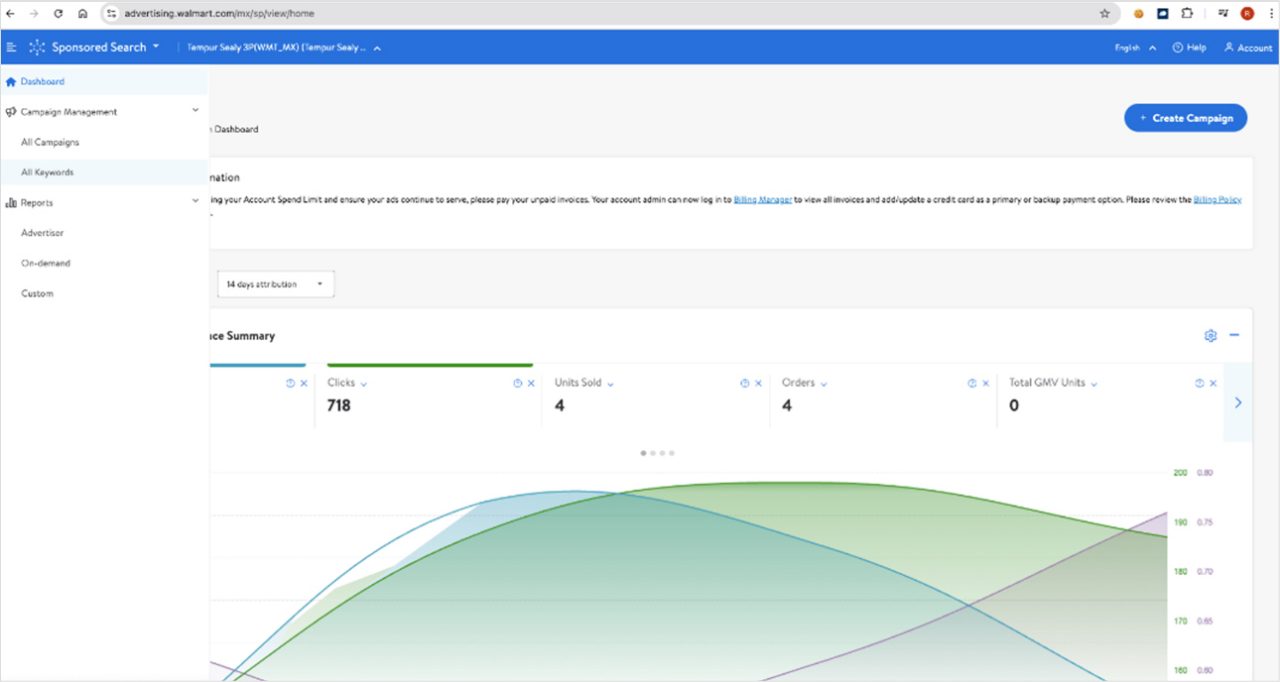
The All Keywords page found under All Campaigns in the left-side navigation lets you, our Sponsored Search advertisers, analyze, strategize and optimize multiple keywords efficiently from a single page.
This page enables you to:
- Analyze performance metrics visually across multiple Sponsored Search campaigns using the performance dashboard.
- Strategize using search, filters and sorting functions
- Optimize using quick actions such as enabling or disabling on multiple keywords at once
- Personalize your data experience by picking the data points visible on the data table
Navigating All Keywords
All Keywords lists 100 keywords per page, but you can choose to view 50, 200 or 300 results per page. By default, the list shows all the keywords associated with live, paused and scheduled campaigns.
Note: Keywords in ended campaigns are not shown.
About the performance dashboard
The All Keywords performance dashboard helps you monitor and optimize your campaigns.
It helps you:
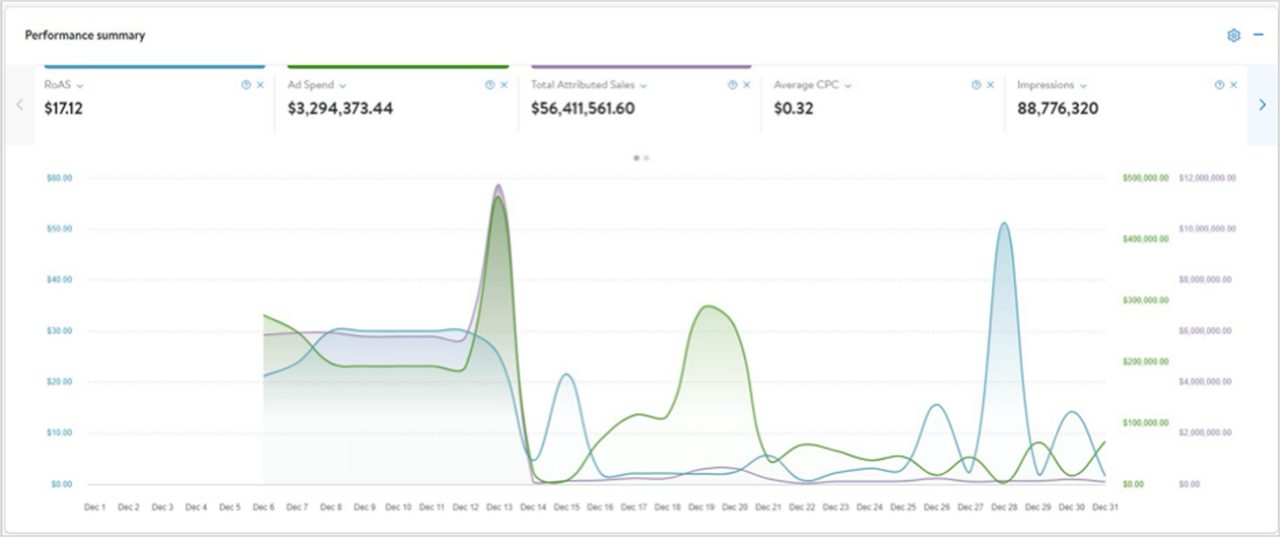
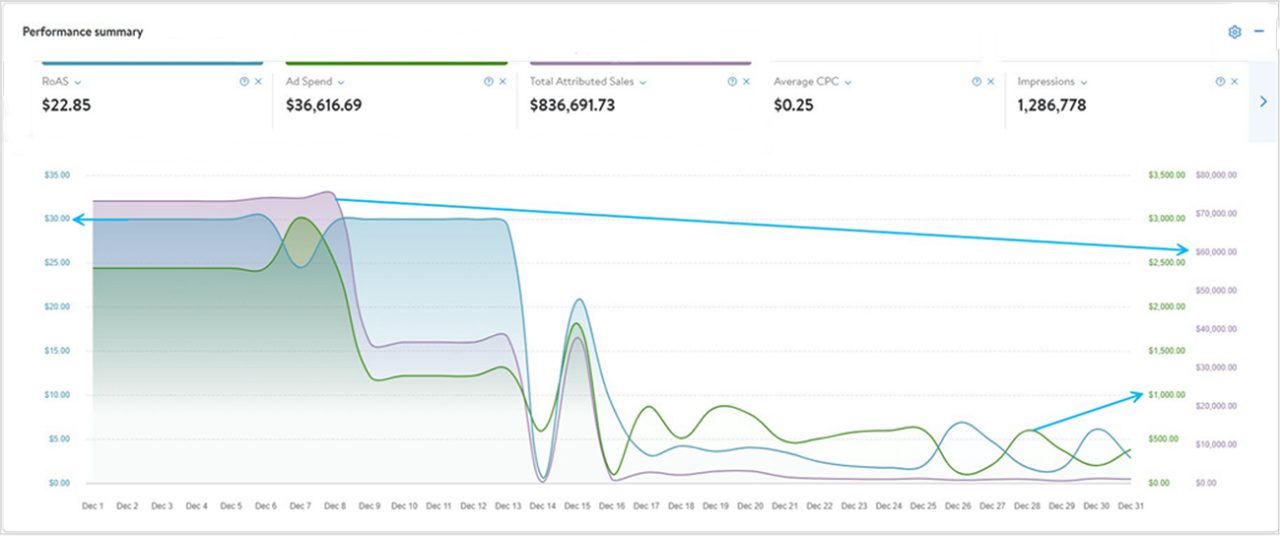
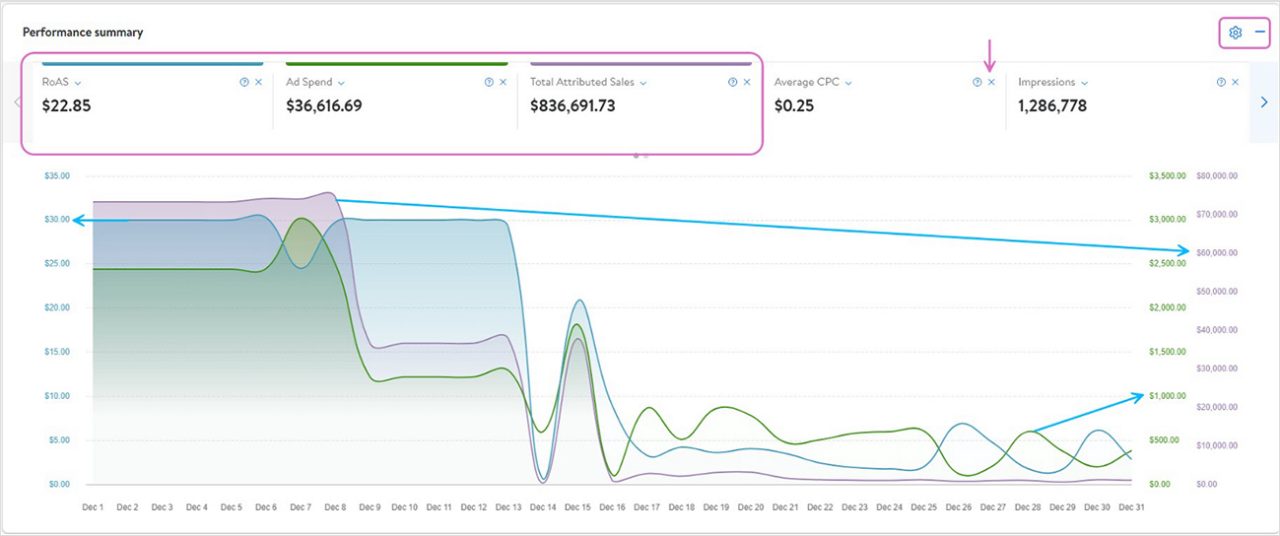
- Get the big picture: See a quick, consolidated overview of your campaign's health with key metrics like ROAS, ad spend, and total attributed sales displayed together for easy comparison.
- Dive deeper for insights: Visualize trends over time with interactive graphs, compare performance across different timeframes and attribution windows and unlock insights to optimize your campaigns and keywords.
- Optimize efficiency and performance: With clear data visualization, you can make informed decisions about budget allocation and keyword targeting, leading to significant performance improvements.
Using the performance dashboard
The performance dashboard shows, by default, the first three metrics: ROAS, ad spend and total attributed sales. You can easily switch between metrics by selecting them along the top. Up to three metrics can be displayed at a time, so if you select a new metric to display without deselecting one, the graph will automatically deselect a metric starting on the left. All performance and conversion metrics are available but can be easily removed by clicking on the X next to them or from the settings icon on the graph.
Y-axis dimensions are color-coded along the left and right side of the graph to correspond to the color of the lines on the graph. The graph can be manipulated by selecting different date ranges, campaigns, attribution windows, campaign statuses and custom filters. Date ranges greater than one month are broken into weekly dimensions, and those greater than six months are broken into monthly dimensions along the x-axis.

About the data table
The All Keywords data table enables you to:
- Analyze keywords offline by downloading your custom view as a file for deeper analysis whenever you need.
- Perform bulk actions on multiple keywords at a time
*For illustration purposes only. May not represent the bids available on the Canadian version of the platform.
Using the data table
The All Keywords data table shows all the keywords associated with scheduled, live and paused campaigns. You can choose to view ended campaigns by selecting that option in the status dropdown.
| Status | Definition |
|---|---|
| Live | Campaign is active and currently serving |
| Paused | Campaign is currently paused and will not serve ads until it is resumed. |
| Scheduled | Campaign is scheduled to launch on the start date set. |
Remember keywords in ended campaigns are not shown.
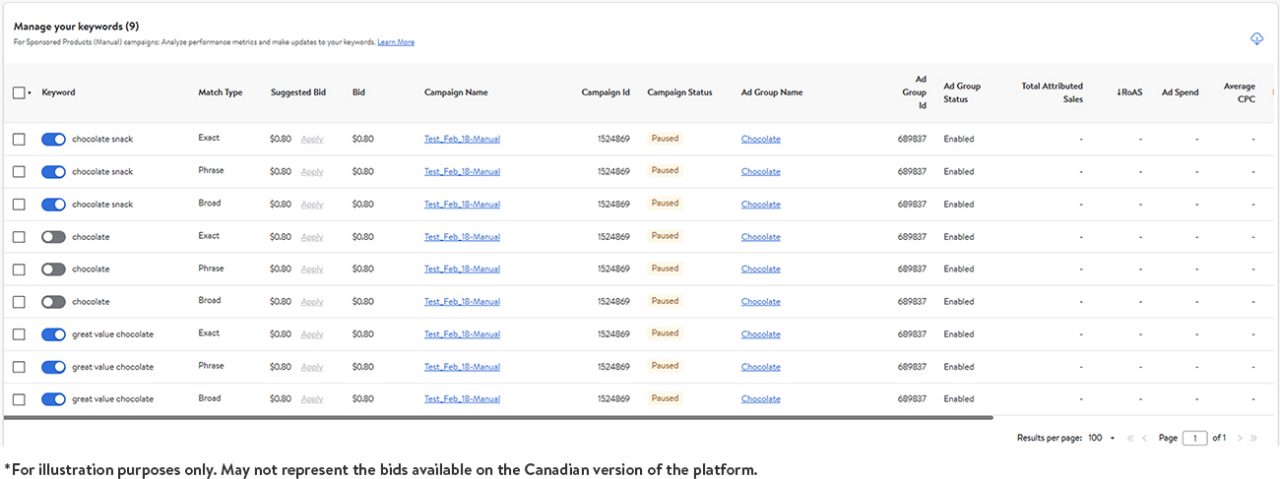
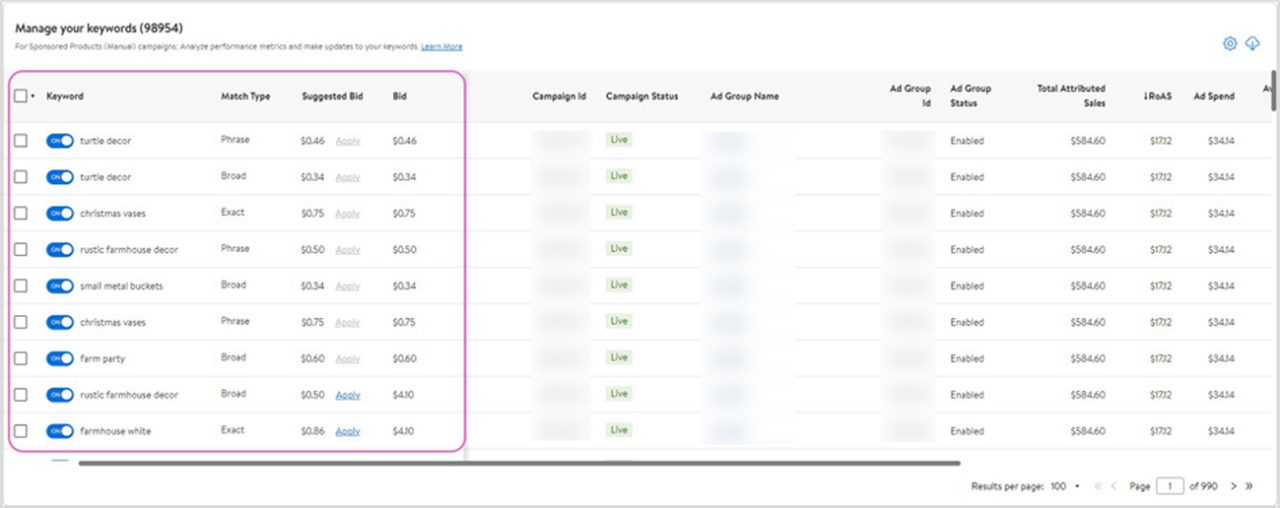
The list details this key information:
- Keyword status (enabled or disabled)
- Bidded keyword
- Bidded match type
- Suggested bid for the keyword and match type combination
- Your current bid
- Campaign name (links to the specific campaign)
- Campaign ID
- Campaign status
- Ad group name (links to the specific ad group)
- Ad group ID
- Ad group status
The first five columns (keyword status, keyword, match type, suggested bid and bid) are frozen in place to allow for a better horizontal scroll experience.
*For illustration purposes only. May not represent the bids available on the Canadian version of the platform.
The list also details the performance and conversion metrics for each keyword.
- Total attributed sales
- ROAS
- Ad spend
- Average CPC
- Impressions
- Clicks
- Click-through-rate (CTR)
- Conversion (based on orders)
- Orders
- Units sold
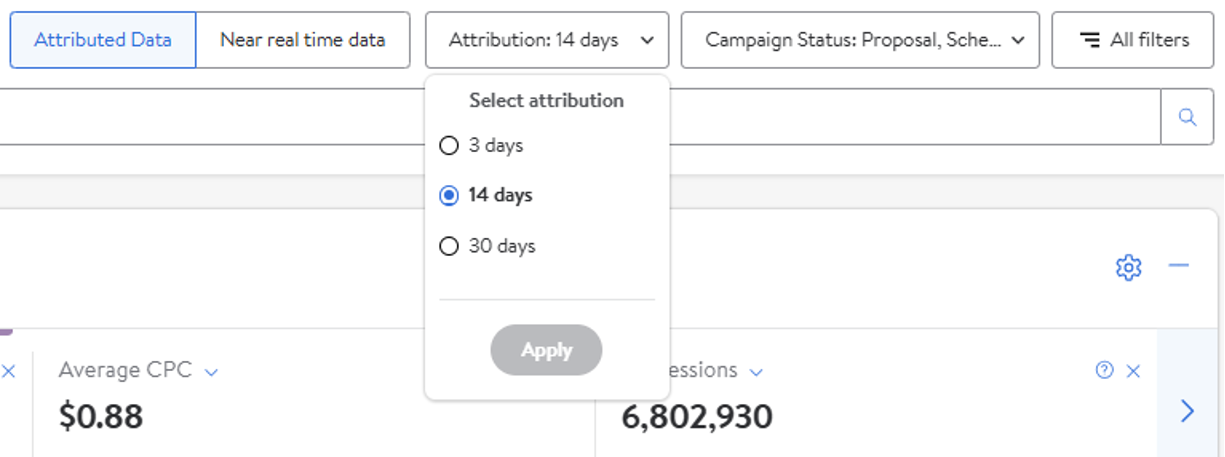
By default, the date range of the data is set to last 30 days, and the attribution window to 14 days, however both the attribution window and the date range can be changed using the attribution quick filter button found along the top. Change the attribution window from the default 14 days to three or 30 days and use the date range selector to pick a pre-populated range or customize it to suit your needs. You can use All Keywords to compare the performance of the same keyword over different weeks, months, quarters and years.

The list is searchable using the search field. You can also apply advanced filters based on attribute and/or conversion metric parameters by selecting All filters. A pop-up box appears on your right. Select the attribute you want to filter on and the option you want to filter by, and/or select the metric under the performance filter and enter scale and value. Values for metrics can include greater than (>), lesser than (<), equal to (=) or a combination. For example, if you wanted to find keywords that were performing at or greater than $3 ROAS, you could filter for ROAS ≥ $3.
Note: There is no limit to the number of filters that can be applied, BUT filters cannot be saved at this time, so leaving or refreshing All Keywords will result in filters resetting to their default.
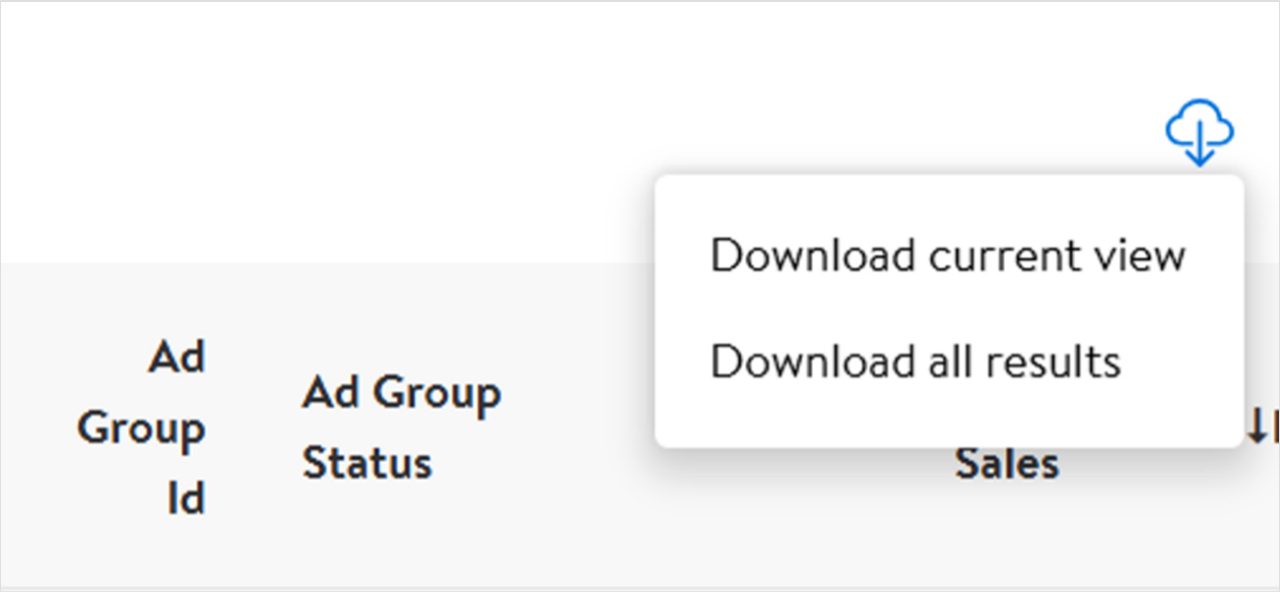
You can download the entire keyword list or specific page view. Download current view downloads the keywords list directly to your computer. Download all results creates a downloadable report called Keyword Optimization in On-demand reports.
Actions you can take with All Keywords
Bulk actions
The All Keywords page empowers you to make individual and bulk updates to keywords based on the information listed.
The sliders next to each keyword enable it (blue) or disable it (gray). Click Apply next to the suggested bid to apply it to each keyword.
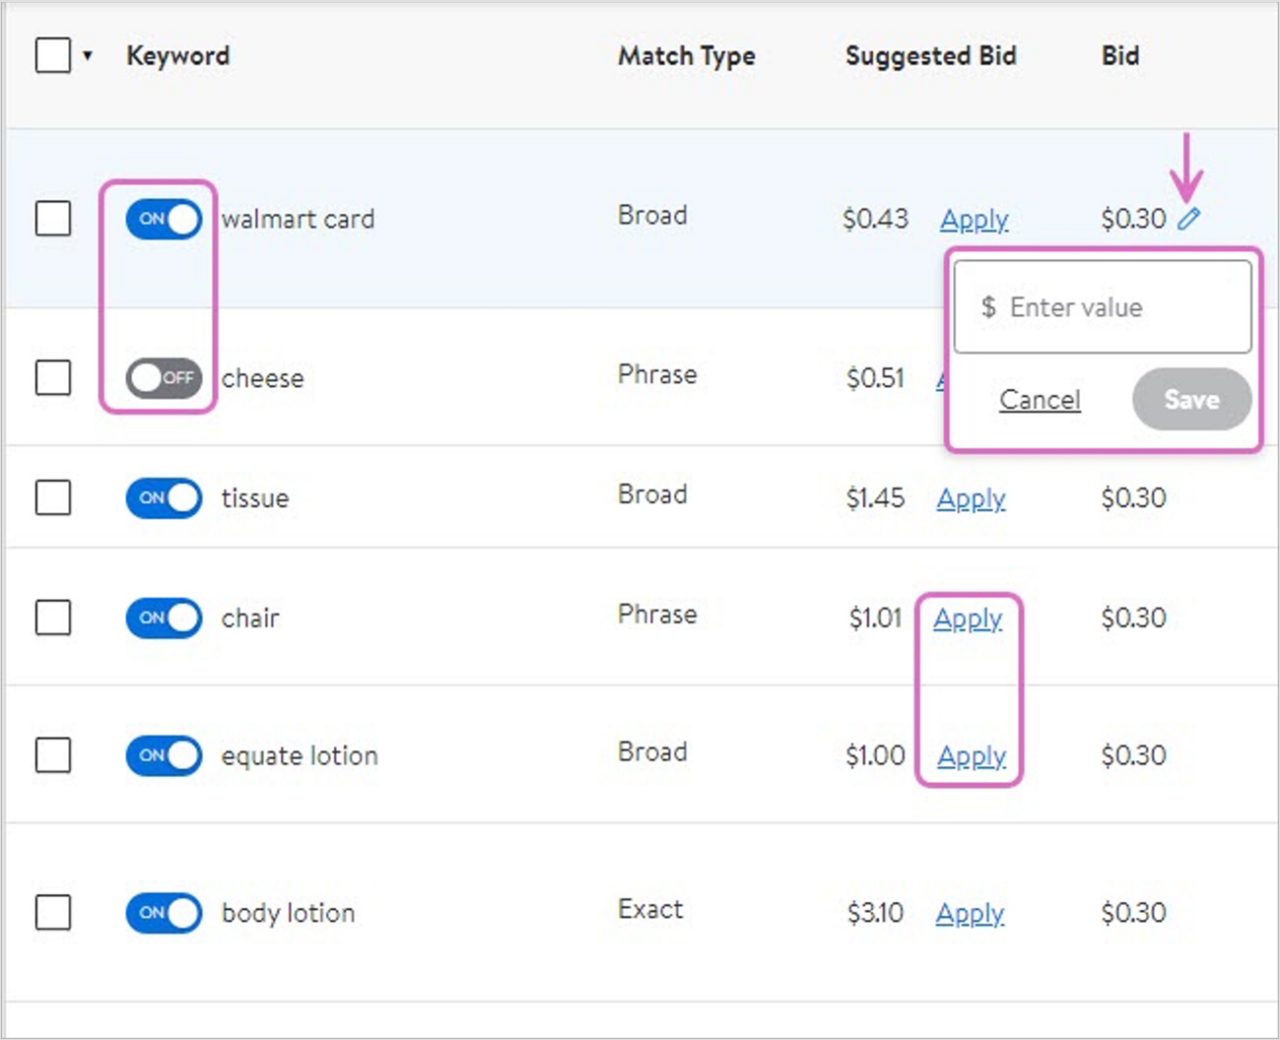
*For illustration purposes only. May not represent the bids available on the Canadian version of the platform
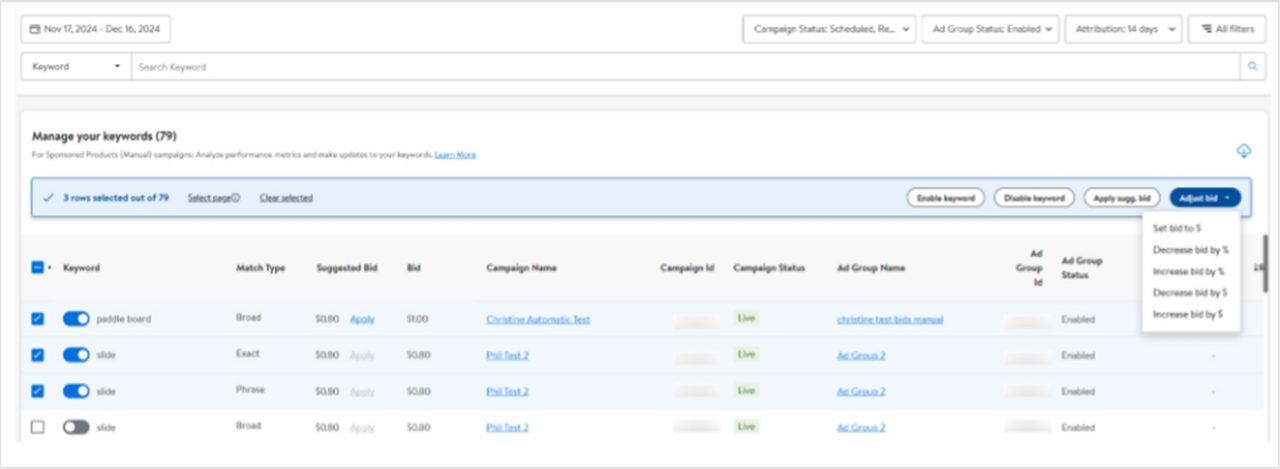
The checkboxes to the left of the keywords enable bulk operations. Select the keywords you want to update. A blue actions bar appears above the list as soon as one or more checkboxes have been selected. You now have the option to:
- Enable or disable the selected keywords
- Apply the suggested bid
- Adjust current bid by distinct value or percentage
Note: When performing bulk operations, make sure you select keywords for which you want to perform the same operation (like increasing their bids by 10%).
*For illustration purposes only. May not represent the bids available on the Canadian version of the platform.
If you are decreasing or increasing bids, keep in mind the base bid thresholds for Sponsored Products (Manual): $0.80 minimum, $100 maximum.
The platform will notify you if all selected keywords have been updated as requested. If there is an issue, the platform will tell you how many keywords produced an error and give you the option of downloading an error report.
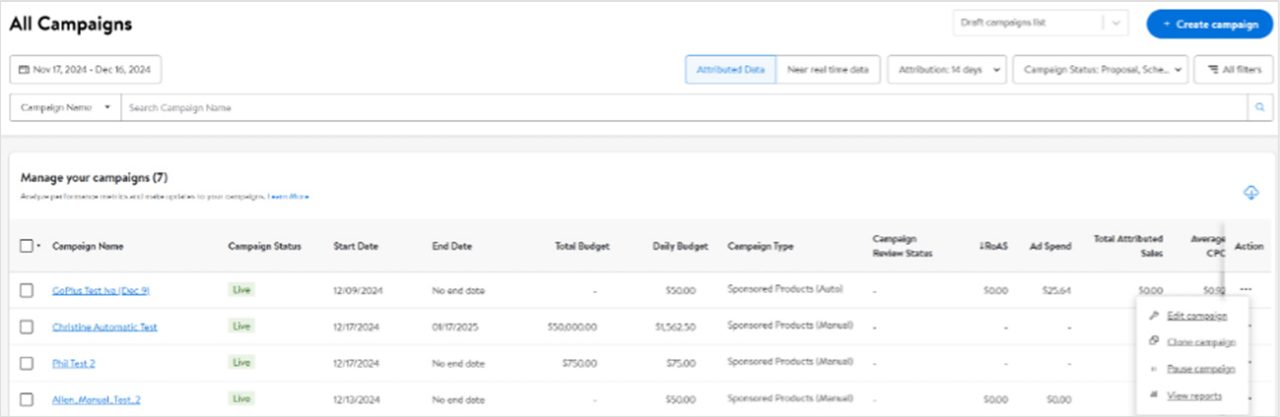
All Campaigns
This article provides an overview of the All Campaigns page including navigating, using, creating, editing or cloning, near-real time data vs. attributed data, and Out of Budget features.
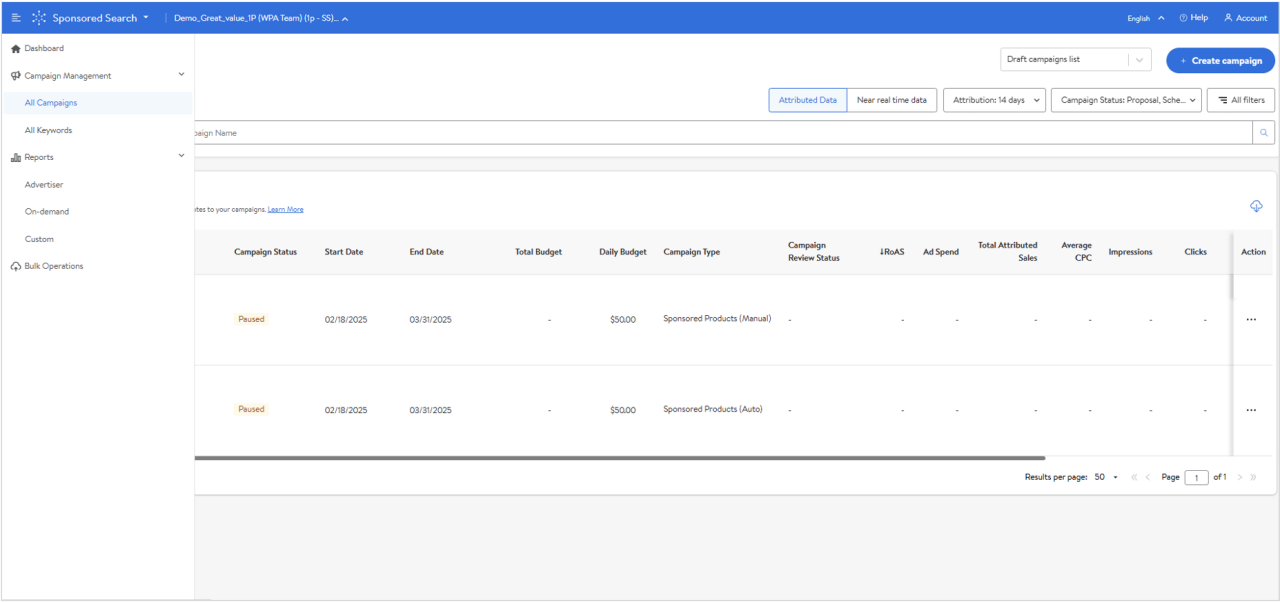
The All Campaigns page is found under Campaign Management in the left-hand navigation lets you access Sponsored Search advertisers, analyze, strategize and optimize multiple campaigns efficiently from a single page.
This page enables you to:
- Analyze performance metrics visually across multiple Sponsored Search campaigns using a performance dashboard.
- Downloading data for offline analysis.
- Strategize using search, filter and sorting functions.
- Optimize individual campaigns or up to 50 campaigns at once by applying pause/start, changing end dates, updating budgets, and applying suggested budgets for out-of-budget campaigns.
Navigating All Campaigns
The top of the All Campaigns page provides a performance dashboard that features performance and conversion metrics (up to three metrics graphed at a time). Below the dashboard, All Campaigns lists 50 campaigns per page, but you can choose to view 100, 200 or 300 results per page.
About the performance dashboard
The All Campaigns performance dashboard helps you monitor and optimize your campaigns.
It helps you:
- Get the big picture: See a quick, consolidated overview of your campaign's health with key metrics like ROAS, ad spend, and total attributed sales displayed together for easy comparison.
- Dive deeper for insights: Visualize trends over time with interactive graphs, compare performance across different timeframes and attribution windows and unlock insights to optimize your campaigns and keywords.
- Optimize efficiency and performance: With clear data visualization, you can make informed decisions about budget allocation and keyword targeting, leading to significant performance improvements.
Using the performance dashboard
When Attributed data is selected, the performance dashboard shows, by default, the first three metrics: ROAS, ad spend and total attributed sales. You can easily switch between metrics by selecting them along the top. Up to three metrics can be displayed at a time, so if you select a new metric to display without deselecting one, the graph will automatically deselect a metric starting on the left. All performance and conversion metrics are available but can be easily removed by clicking on the X next to them or from the settings icon on the graph.
Y-axis dimensions are color-coded along the left and right side of the graph to correspond to the color of the lines on the graph. The graph can be manipulated by selecting different date ranges, campaigns, attribution windows, campaign statuses and custom filters. Date ranges greater than one month are broken into weekly dimensions, and those greater than six months are broken into monthly dimensions along the x-axis.
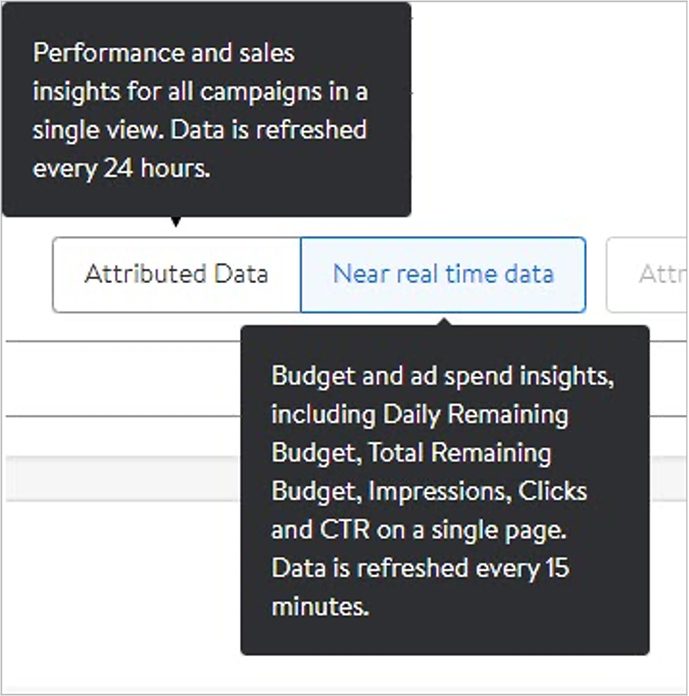
Note: The performance dashboard is not available when Near real time data is selected as the focus is on attributed metrics, which are not part of the near-real time view.
Collapse the performance graph at any time to focus on the list of campaigns below it.
About the data table
The All Campaigns data table enables you to:
- Analyze campaigns offline by downloading your custom view as a file for deeper analysis whenever you need.
- Perform bulk actions on up to 50 campaigns at a time.
- Get out-of-budget and budget-at-risk information and apply budget suggestions.
Using the data table
The All Campaigns data table shows all the campaigns associated with proposal, scheduled, live and paused campaigns. You can choose to view ended campaigns by selecting that option in the status dropdown.
| Status | Definition |
|---|---|
| Proposal | Campaign is under review (applies to Sponsored Brands and Sponsored Videos) |
| Live | Campaign is active and currently serving |
| Paused | Campaign is currently paused and will not serve ads until it is resumed. |
| Scheduled | Campaign is scheduled to launch on the start date set. |
| Ended | Campaign has ended and will not serve ads. |
Note: You cannot edit Ended campaigns in this view, but you can reactivate them and then edit them.
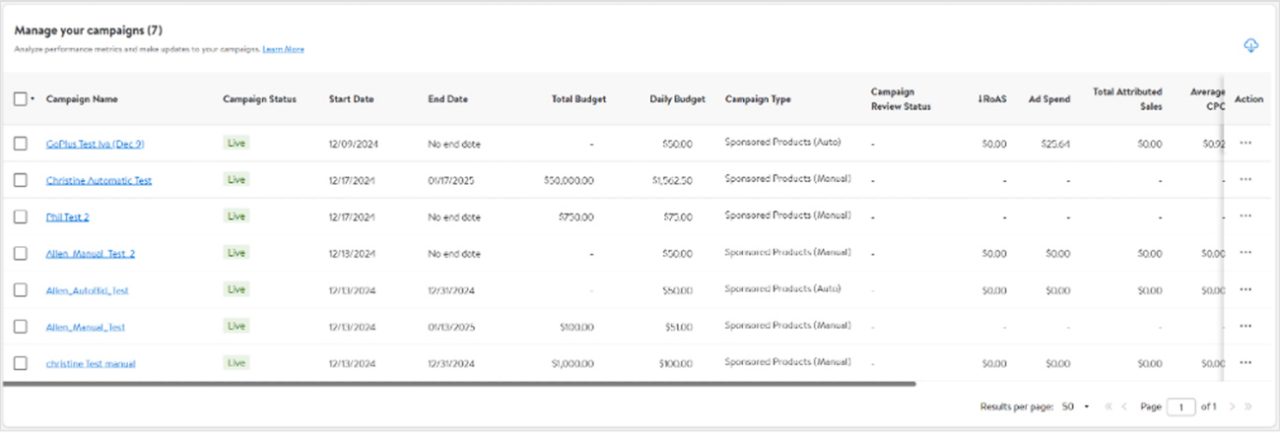
The list details this key information:
| • Campaign name (links to the specific campaign) | • Campaign type |
| • Campaign status | • Campaign review status |
| • Start date | • End date |
| • Total budget | • Daily budget |
| • Suggested daily budget |
The first two columns (campaign name and status) and the action column are static to allow for a better horizontal scroll experience. The action column enables you to take specific actions on the selected campaign.

The list also details the performance and conversion metrics for the different data views.
| Attributed view metrics | Near-real time metrics |
|---|---|
| • Impressions | • Impressions |
| • Clicks | • Clicks |
| • CTR | • CTR |
| • ROAS | • CPC |
| • CPC | • Ad Spend |
| • Conversion (order based) | • Daily remaining budget |
| • Orders | • Total remaining budget |
| • Units | |
| • Ad Spend | |
| • Total attributable sales |
Near-real time data shows metrics that do not require attribution, meaning they don’t require a certain amount of time to assign the data to the campaign. Attributed data shows data that requires an attribution window, like sales metrics (ROAS, total attributed sales), so they do require a campaign to be live for a certain amount of time.
The default attribution window for conversion metrics is for the last 14 days, but both the attribution window and the date range can be changed using the attribution quick filter button found along the top. Change the attribution window from the default 14 days to three or 30 days and use the date range selector to pick a prepopulated range or customize it to suit your needs.
Select near-real time data at the top of the table to see live campaigns and the remaining budget for them. This view allows you to easily identify campaigns that are over- or under-pacing and adjust the budget accordingly. The near real-time data view only shows campaign data for the last seven days. This date range cannot be changed.
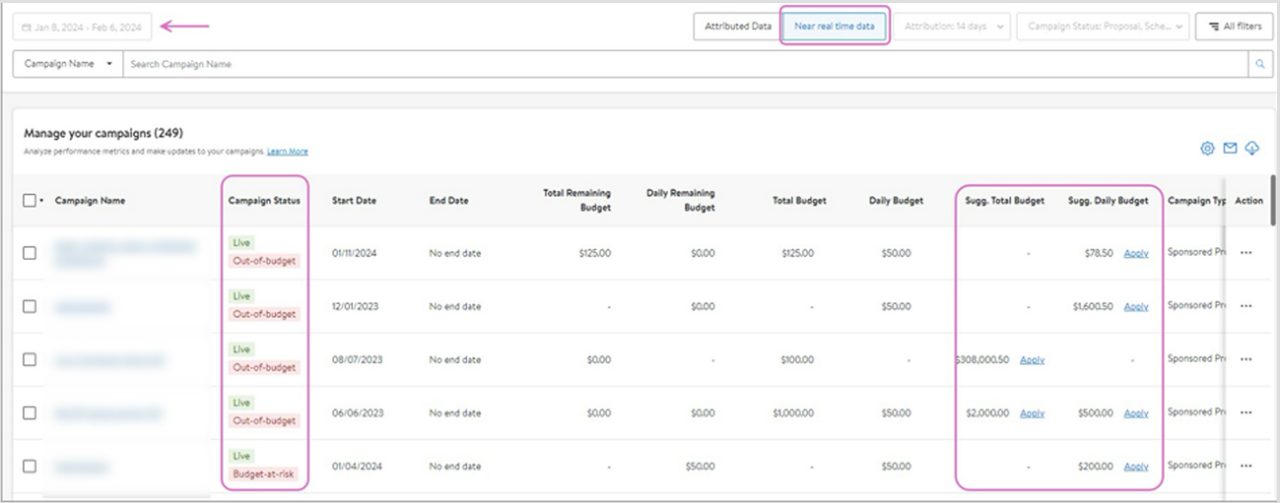
Note: You cannot edit start dates or choose campaign statuses on the Near real time view. You can change the end date for live campaigns.
The list is searchable by campaign name or campaign ID. Select the option from the dropdown to the left of the text box and enter the details in the search text box.
You can also apply advanced filters based on attribute and/or performance under All filters. Select All filters to open a window on the right. Select the attribute(s) you want to see and the option you want to filter by, and/or select the metric under the performance filter and enter scale and value. Values for metrics can include greater than (>), lesser than (<), equal to (=) or a combination. For example, if you wanted to find campaigns that were performing at or greater than a certain ROAS, you could filter for ROAS ≥ $x.xx.
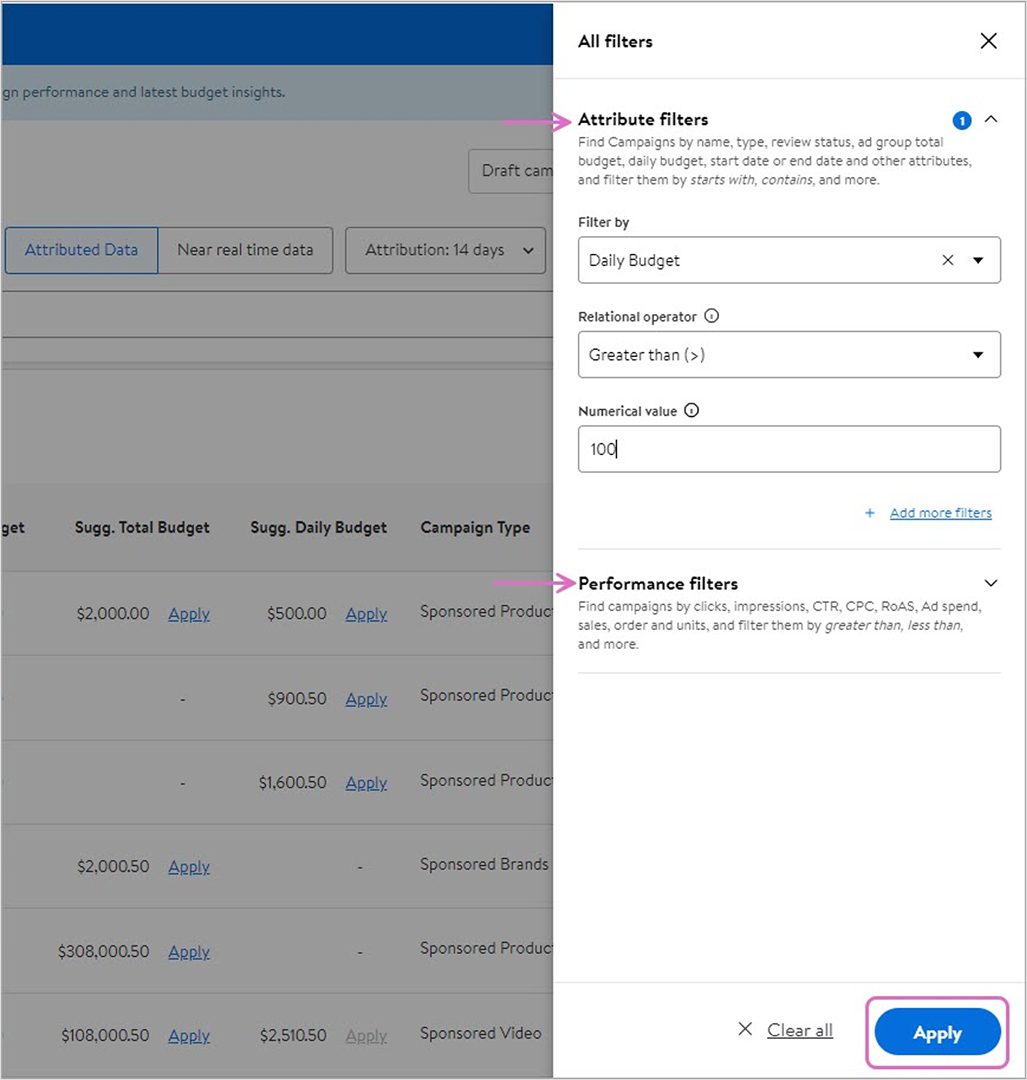
Note: There is no limit to the number of filters that can be applied, but filters cannot be saved at this time, so leaving or refreshing the All Campaigns page will result in filters resetting to the default.
You can download the entire campaigns list or specific page view. Download current view downloads the campaigns list directly to your computer. Download all results creates a downloadable report called Campaign Optimization in On-demand reports. For additional details on On-demand reports, click here.
Actions you can take with All Campaigns
Apply bulk actions
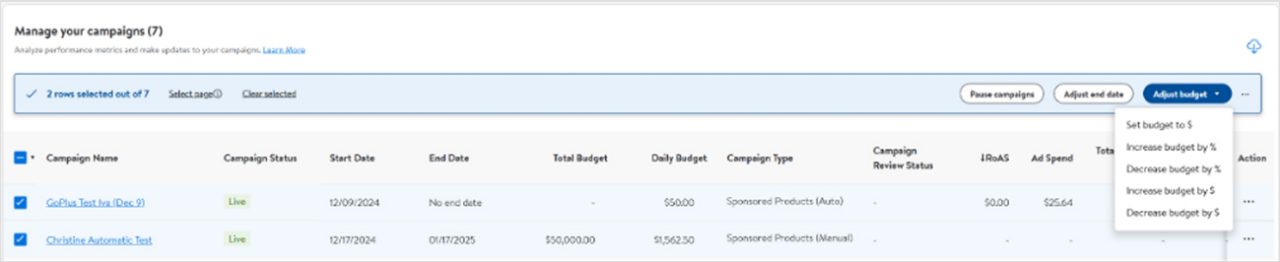
The All Campaigns page empowers you to make individual and bulk updates to campaigns based on the information listed. You can apply bulk actions for up to 50 campaigns at a time.
The checkboxes to the left of the campaigns enable bulk operations. Select the campaigns you want to update. A blue action bar appears above the list as soon as one or more checkboxes have been selected. You now have the option to:
- Enable or Pause campaigns
- Adjust end dates
- Adjust budgets
Note: When performing bulk operations, make sure you select the campaigns for which you want to perform the same operation (like adjusting a budget).
If you are decreasing or increasing budgets, keep in mind the minimum thresholds for Sponsored Search. In case your budget falls below the threshold for daily and/or total budget, the minimum thresholds will be automatically applied:
- The total budget must be at least $100, and the daily budget must be at least $50.
- Alternatively, you can launch a campaign with only a daily budget, which has a minimum of $50 per day.
The platform will notify you if all selected campaigns have been updated as requested. If there is an issue, the platform will tell you how many campaigns produced an error and give you the option of downloading an error report.
Create and edit campaigns
Click Create campaign to create a new campaign.
Any draft campaigns that were saved during setup, but not scheduled, are listed here under the Draft campaigns list dropdown menu. Clicking on any of the campaigns in the dropdown menu will open up the campaign creation page with all the saved information.
Under the Actions column, click on the three horizontal dots (•••) to the right of any campaign to edit, clone, pause or view campaign reports.
- Edit will open the campaign setup page where you can make campaign adjustments like another ad group or increase your daily budget.
- Clone will create a clone of your selected campaign and give you the option to rename and edit the campaign details before scheduling.
Note: The ability to edit or clone a campaign is only visible to users with Admin or Write access.
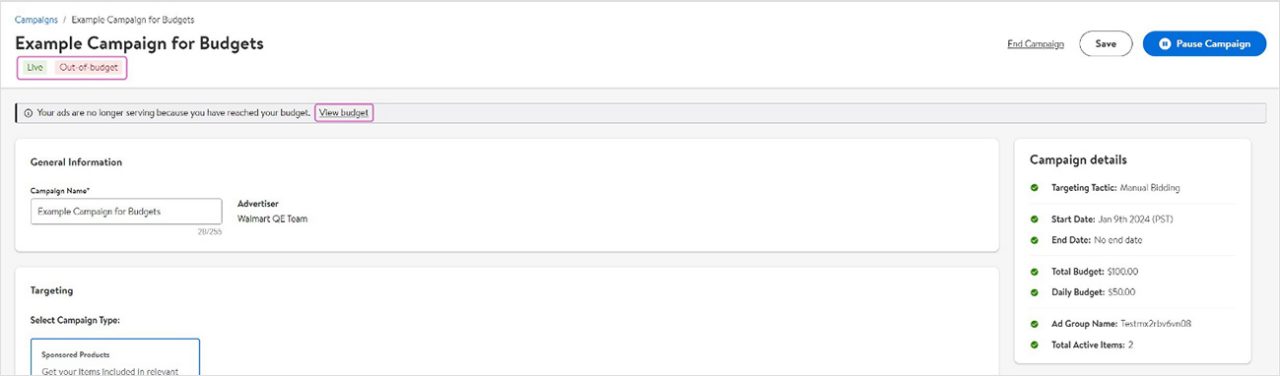
This implies the daily budget type is not applicable for that campaign. All the campaigns with a dash and/or zero will be sorted by campaign ID.
I see a dash (-) in the daily budget or total budget of the Attributed tab on the All Campaigns page for my out-of-budget or budget-at-risk campaigns.
This implies the daily budget type is not applicable for that campaign.
Reactivating an ended campaign
All Campaigns allows you to easily reactivate ended campaigns.
- Locate the ended campaign(s) you want to reactivate.
- Click on the three horizontal dots (•••) under Actions.
- Select Reactivate campaign.
- Edit end date and budgets within the data table.
You also have the option of opening the campaign directly by clicking on the campaign’s name and using the Reactivate campaign button in the upper right corner.
Related content
If you are looking to manage your Sponsored Products manual campaign keywords, visit the All Keywords guide to learn more.
Step 1 — Create a campaign
This article takes you through the first step in creating a new Sponsored Products campaign: choosing your campaign type (automatic or manual) and setting your flight dates and budget. You’ll also learn how to edit your budget and apply in-flight out-of-budget recommendations.
To create a new campaign, click on the Create campaign button in the upper right of either the Dashboard or Campaigns tab.

Enter your campaign's name.
Note: If this is your first time creating a campaign in the Walmart Connect Ad Center, we recommend being descriptive with your naming convention.
Campaign type & targeting tactic
After you’ve entered your information, proceed to either the optional Bid Multiplier section or the Placement Inclusion section (for manual campaigns).
In the Targeting section, select your campaign type as Sponsored Products and targeting tactic.
For targeting, you have the choice between Automatic and Manual.
Automatic — Used to create a content-driven campaign where Walmart decides when and where to display your ad based on keywords identified from the product title, description and other sections of your item page, in addition to product category and related products.
Manual — Gives you greater transparency and control as it allows you to select and target individual keywords and products.
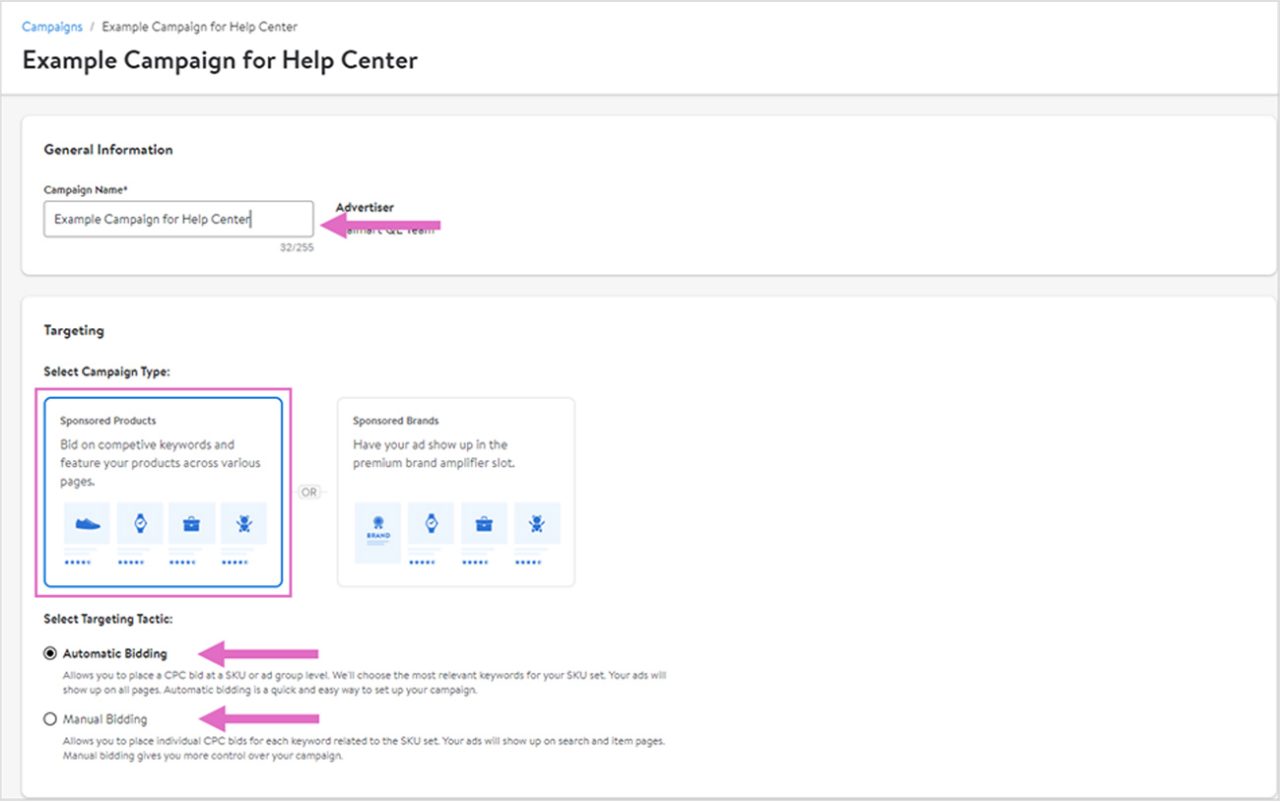
Note: Launch campaigns with as many products as you can to discover which ones are driving the most results. Create detail-oriented campaigns—organize Ad Groups by product categories, top-selling SKUs, low profitable SKUs, seasonal SKUs, and new SKUs. You'll have more control and higher visibility into product performance.
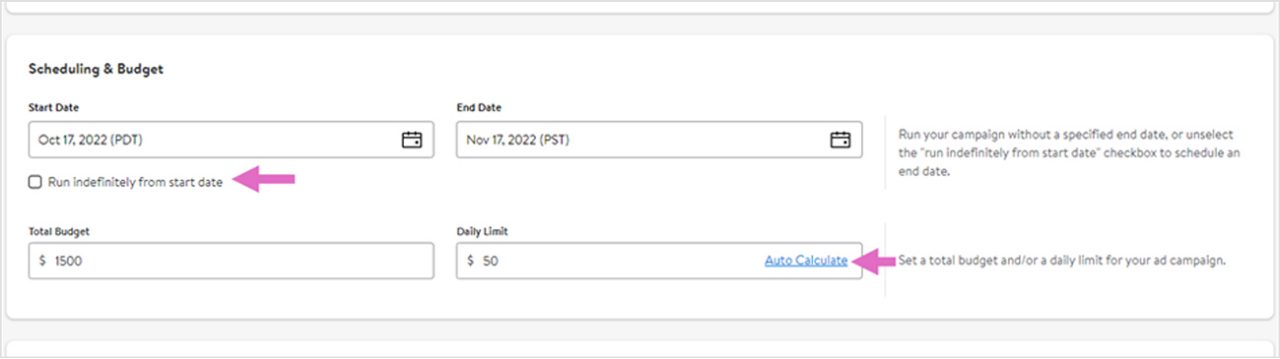
Scheduling & budget
In the Scheduling & Budget section, set your campaign duration and budget.
Select a start date for your campaign. Selecting the current date (today) will launch within the hour.
Run indefinitely from start date is selected by default. This allows your campaign to run with no end date, but your campaign will end once your total budget has been spent. If you uncheck this, you have the option of setting an end date for your campaign. This end date will stop your campaign even if there is still budget left.
Next, set a total budget and/or a daily limit for your campaign.
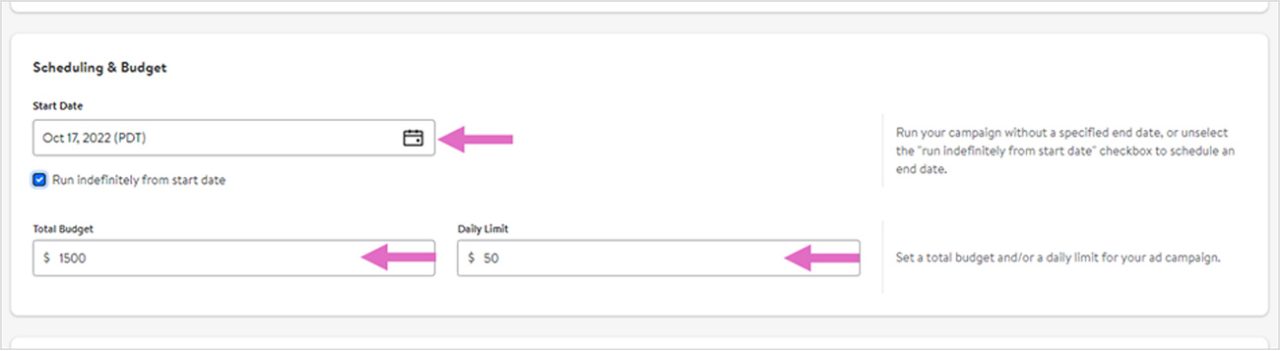
Total budget represents the most you will spend on the campaign. As your account will be charged per ad click, the final campaign spend may be equal to or less than the total budget but will never exceed it.
For Marketplace sellers: the total budget must be $50 or above.
Note: If you set only a total budget, your campaign will spend this amount as quickly as possible.
Daily limit represents the most you will spend each day of the campaign. As your account will be charged per ad click, daily spend may vary. It cannot exceed your total budget.
For Marketplace sellers: the daily limit must be $50 or above.
Note: If your campaign does not spend all of its daily budget, the unused amount will roll over to the next day (and continue to do so if unused), BUT daily spend will never exceed 2X the daily limit.
For example:
- If you set a daily limit of $100 and spend $50, the daily limit for the following day, with the addition of rollover budget, will be $150.
OR
- If you set a daily limit of $500 and spend $100, the daily limit for the following day will be $900. If your campaign again spends $100, the daily limit for the following day will be $1000 (capped at 2X your set daily limit).
Note: If you set only a total budget, you will not be able to add a daily limit once the campaign is live. Similarly, if you create a campaign with only a daily limit, you will not be able to add a total budget once the campaign goes live.
If you unchecked Run indefinitely from start, you will also see an Auto Calculate button next to Daily limit. This button will divide your total budget by the total number of days your campaign will run, to provide an equally distributed daily limit amount. For example, if your campaign is 30 days long and you set a total budget of $6,000, pressing the Auto Calculate button will enter $200 for your daily limit.
Note: If the calculated amount is lower than the minimum required daily budget, it will default to the minimum amount.
Step 2 — Set Placement Inclusion
This article explains how to use the Placement Inclusion section in Manual Campaigns.
If you chose Manual as your targeting tactic, you have the option to include additional placement options.
Placement inclusion
By default, the Search In-grid placement is toggled on and cannot be toggled off.
Note: Inclusion of additional placements is optional but is highly recommended to expand reach.

Placement types
Search In-grid
This is the default placement for Manual campaigns. When a customer makes a search query and you are bidding on that keyword/match type, your item may be eligible to serve on the Sponsored Products In-grid placements within the search results.
Search carousel
When a customer makes a search query and you are bidding on that keyword/match type, your item may be eligible to serve on the Sponsored Products carousel placement below the search results.
Buy Box & item carousel
When a customer lands on an item page and you are bidding on a keyword/match type of one of the anchor item entities, your item may be eligible to serve on the Sponsored Products Buy Box and/or carousel placement on the item page.
An anchor item is an item page where you want your ads to appear. The following are considered anchor item entities:
- Item title
- Item brand
- Item taxonomy
Below is an example of an anchor item, the anchor item entities and possible keywords to target:
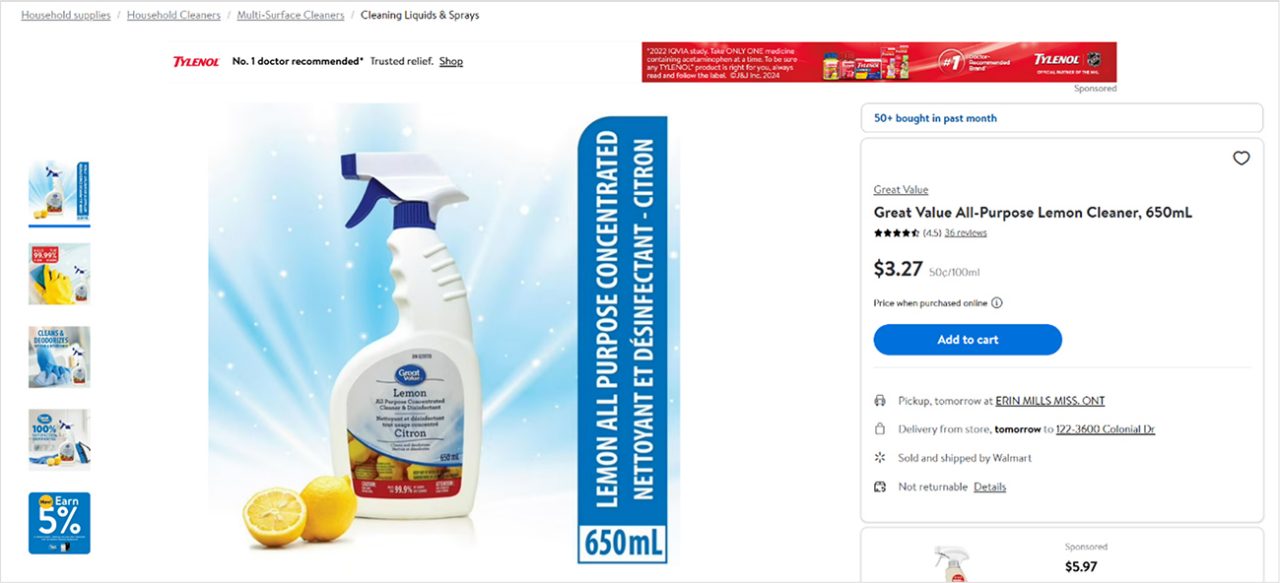
- Anchor item: 44932619
- Anchor item entities:
- Item title: Great Value All Purpose Cleaner, Lemon Scent, 32 fl oz
- Item brand: Great Value
- Item taxonomy: Household Essentials/Cleaning Supplies/All-Purpose Cleaners
- Possible keywords to target:
- Great Value
- Great Value All Purpose Cleaner, Lemon Scent, 32 fl oz
- Great Value Household Essential
- Household Essentials/Cleaning Supplies/All-Purpose Cleaners
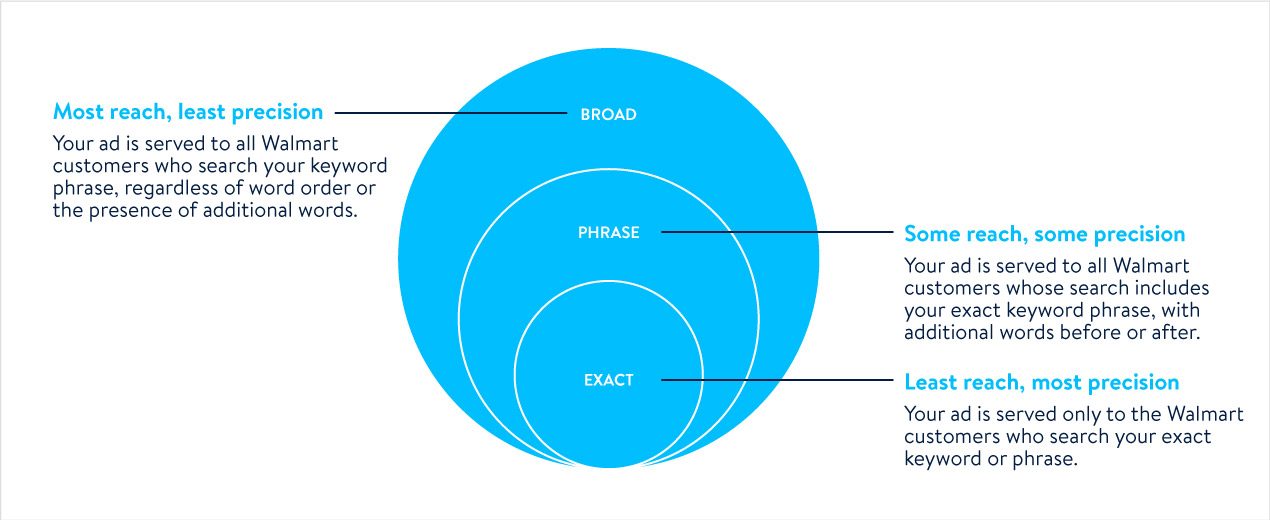
Match types for item page placements
Exact-match: all bidded keywords should be present in the same order and should be continuous (except for stop words or functional words). There cannot be any additional words in the entity.
- Great Value
- Household Essentials
- Great Value All Purpose Cleaner, Lemon Scent, 32 fl oz
- Cleaning Supplies
- Lemon Scent
Phrase-match: all bidded keywords can be in any order, however all the words should be in one entity and should be continuous. There can be any additional words in the entity before and after the bidded keywords.
- Great Value Lemon Scent
- All-Purpose Cleaners Cleaning Supplies
- Essential Household
- Lemon Scent All-Purpose Cleaners
Broad-match: all bidded keywords can be present in any order and do not need to be continuous.
- Great Cleaning
- Lemon Cleaner
- Household Cleaner
- Cleaners
- Cleaning
How to use keywords and match types to target item placements
Example 1 — If you want to target shampoo item pages but unsure of which item(s) to specifically target:
Start by targeting item pages based on their taxonomy using broad- or phase-match. It could be any level of the hierarchy such as "beauty” "hair care” or "beauty hair care." Use the on-demand Keyword Performance report to identify the item pages your ads appeared on and performed well on. Narrow match types and/or target specific item entities to specifically target those pages.
Example 2 — If you know which item pages you want to target:
Use the item title of the targeted item page as the bidded keyword with exact-match, such as "Equate Everyday Clean Dandruff Shampoo, 33.8 fl. oz." Alternatively, use "Equate Everyday" as the bidded keyword with phrase- or broad-match to target any/all items that contain the keyword in their item title such as:
- Equate Everyday Clean Dandruff Shampoo, 23.7 fl oz
- Equate Everyday Clean 2 in 1 Dandruff Shampoo & Conditioner, 13.5 fl oz
- Equate 14.2 fl Oz Everyday Clean Dandruff Shampoo
- Equate 2N1 Everyday Clean Dandruff Shampoo & Conditioner, 32.1 fl oz
Example 3 — Target your own item pages to ensure competitor ads are not appearing.
Use the item brand of your items as the bidded keyword to target all the item pages under your brand, such as "Equate" with exact-match.
Ready to continue your campaign setup? Continue to Add Bid Multipliers — Step 3.
Step 3 — Add Bid Multipliers
This article explains what bid multipliers are and how to apply them.
If you're creating Automatic or Manual campaigns, you will have the option to set bid multipliers.
What are bid multipliers?
Bid multipliers give you additional opportunities to optimize your advertising campaigns. This bidding feature helps you manage your Sponsored Products campaign by enabling you to increase your bids on prime placements and platforms, while keeping your base bid low.
Note: Bid multipliers are optional, but highly recommended.
Bid Multipliers for Automatic campaigns
Bid Multipliers for Manual campaigns
Setting and using bid multipliers
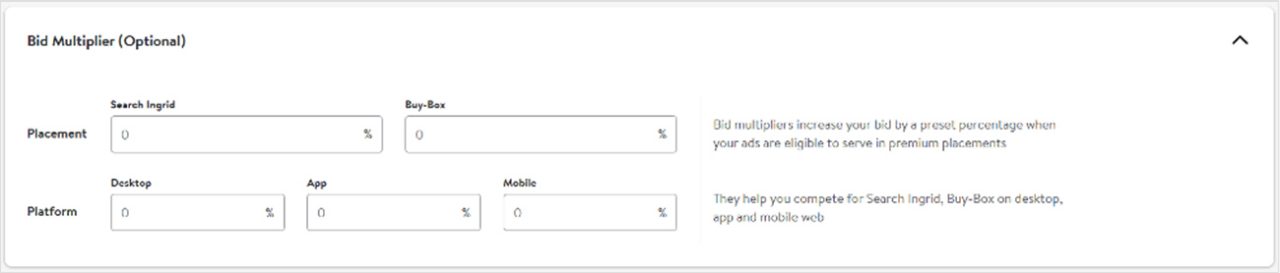
There are two types of bid multipliers, Placement and Platform.
Placement multiplier
This control allows you to set bid modifiers starting at 0% for various placements, depending on your campaign type. When your ads are eligible to serve in these placements, the bid percentages you set will help you better compete for these placement opportunities.
Example:
- Starting bid: $0.80
- Search In-grid Multiplier: 200%
- Resulting bid for Search In-grid ad position: $0.80 + 200% = $2.40
Platform multiplier
This control allows you to set bid multipliers starting at 0% for desktop, app and mWeb (mobile web) platforms. When your ads serve on these platforms, the bid percentages you set will help you better compete for these platform opportunities.
Example:
- Starting bid: $1.00
- mWeb Multiplier: 90%
- Resulting searches on Mobile: $1.00 + 90% = $0.90
If you use both Placement and Platform multipliers, your bid multipliers will be added together.
Example:
- Starting bid: $1.00
- Buy Box Multiplier: 50%
- Desktop Multiplier: 150%
- Resulting bid for Buy Box position on Desktop: $1.00 + (50% + 150%) = $3.00
If bid multiplier = 0% or blank, your bid will remain the same as the bid entered at item or keyword level.
Note: There is no maximum bid multiplier amount, so please make sure you understand and are comfortable spending the multiplier amount you are setting.
Ready to continue your campaign setup journey? Continue to Create Ad Groups — Step 4
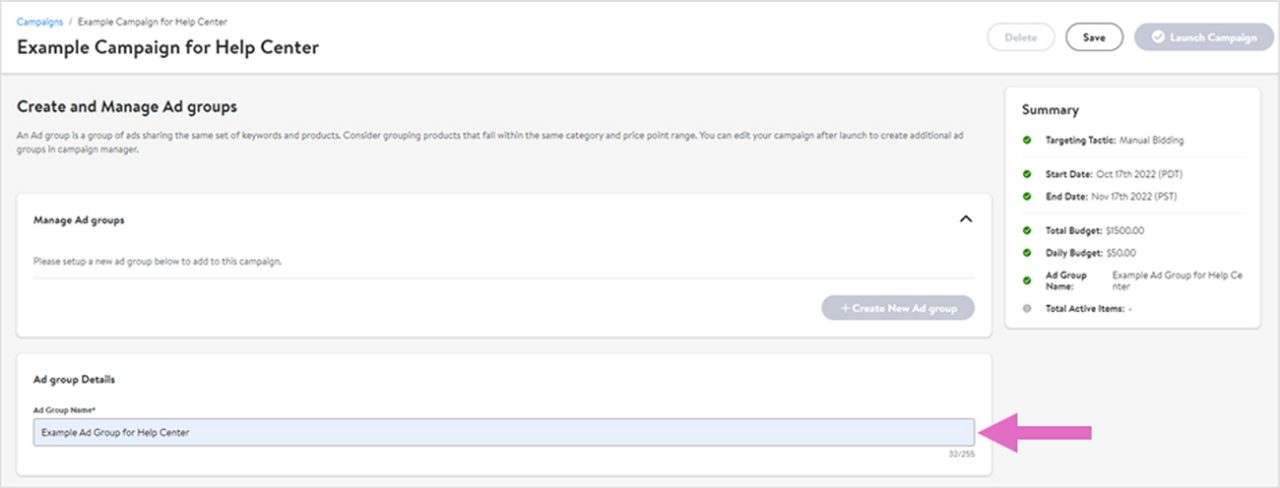
Step 4 — Create Ad Groups
This article shows you how to create ad groups within your campaign. Ad groups are grouped items and keywords within a campaign.
Setting up your campaigns ad group(s)
Each campaign must have at least one ad group. Ad groups are unique to their campaign. Each ad group is limited to a maximum of 2,000 items. Your targeting tactic (Automatic vs. Manual) determines the level at which to set your bids.
Ad groups can be enabled or disabled while the campaign is live as can the items and/or keywords within them. By default, ad groups are always enabled. To create more than one ad group, you must first save the campaign. This will enable the Create new ad group button.
Name your ad group under Ad group details.
Note: Remember to give your ad groups names that will easily distinguish them from each other.
Launch campaigns with as many products as you can to discover which ones are driving the most results. Create detail-oriented campaigns—organize Ad Groups by product categories and SKUs (top-selling, low profitable, seasonal, and new). This can provide more control and higher visibility into product performance.
How to set up your Ad Group(s) for success
For Automatic campaigns:
- Cluster similar products together to enable you to track performance accordingly.
For Manual campaigns:
- Create ad groups for products with similar attributes and related keywords.
- Include no more than 50–100 products per ad group.
- Organize groups by related keywords, brands, product categories and top sellers, so all products can be found via search easily.
- Choose a naming convention that is easily relatable to items in the ad group.
- Continuously check ad group performance reports to optimize campaigns.
Ready to continue your campaign setup journey? Continue to Add Items to an Ad Group — Step 4 (continued).
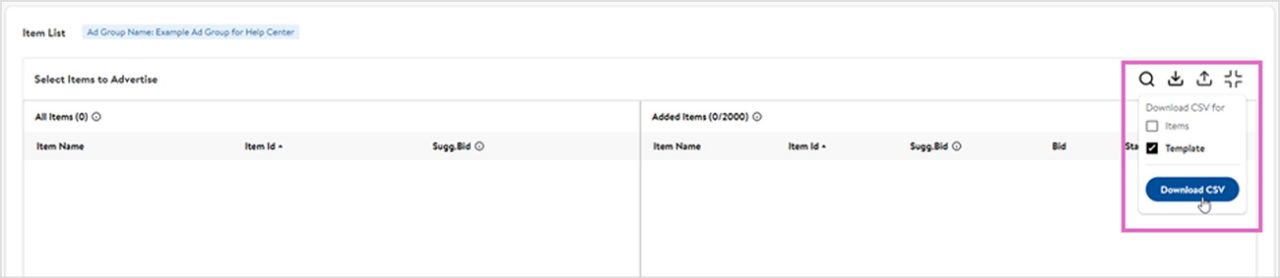
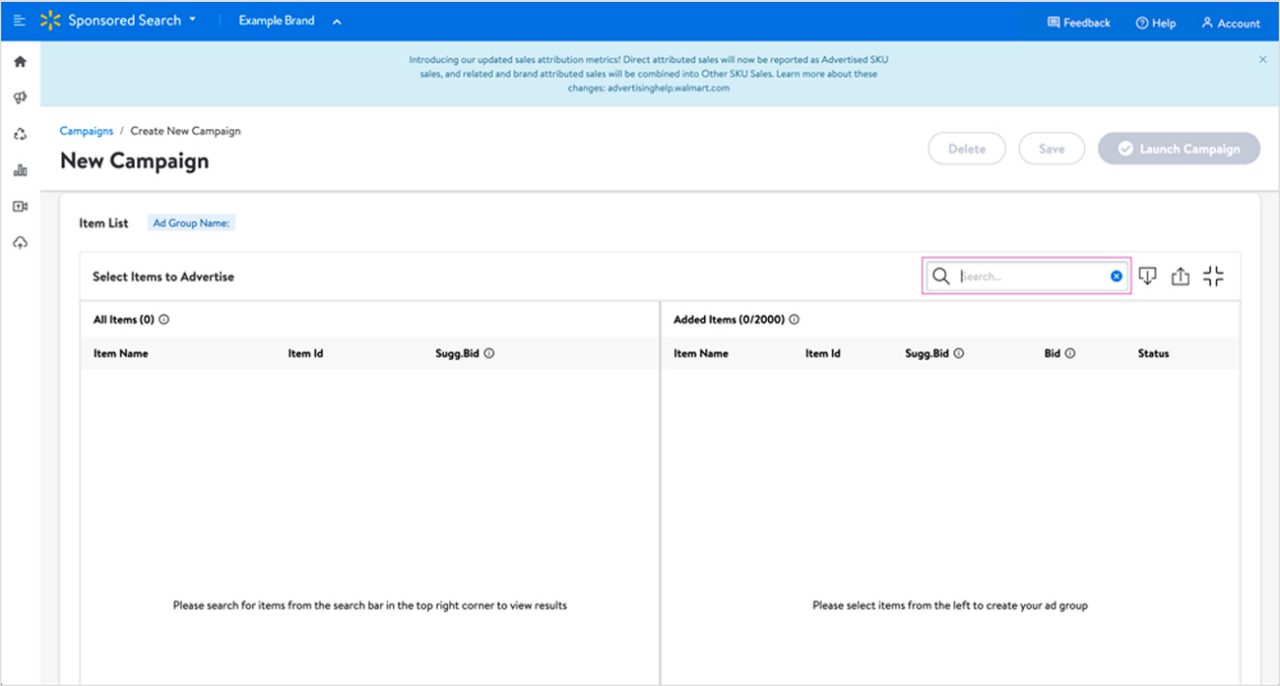
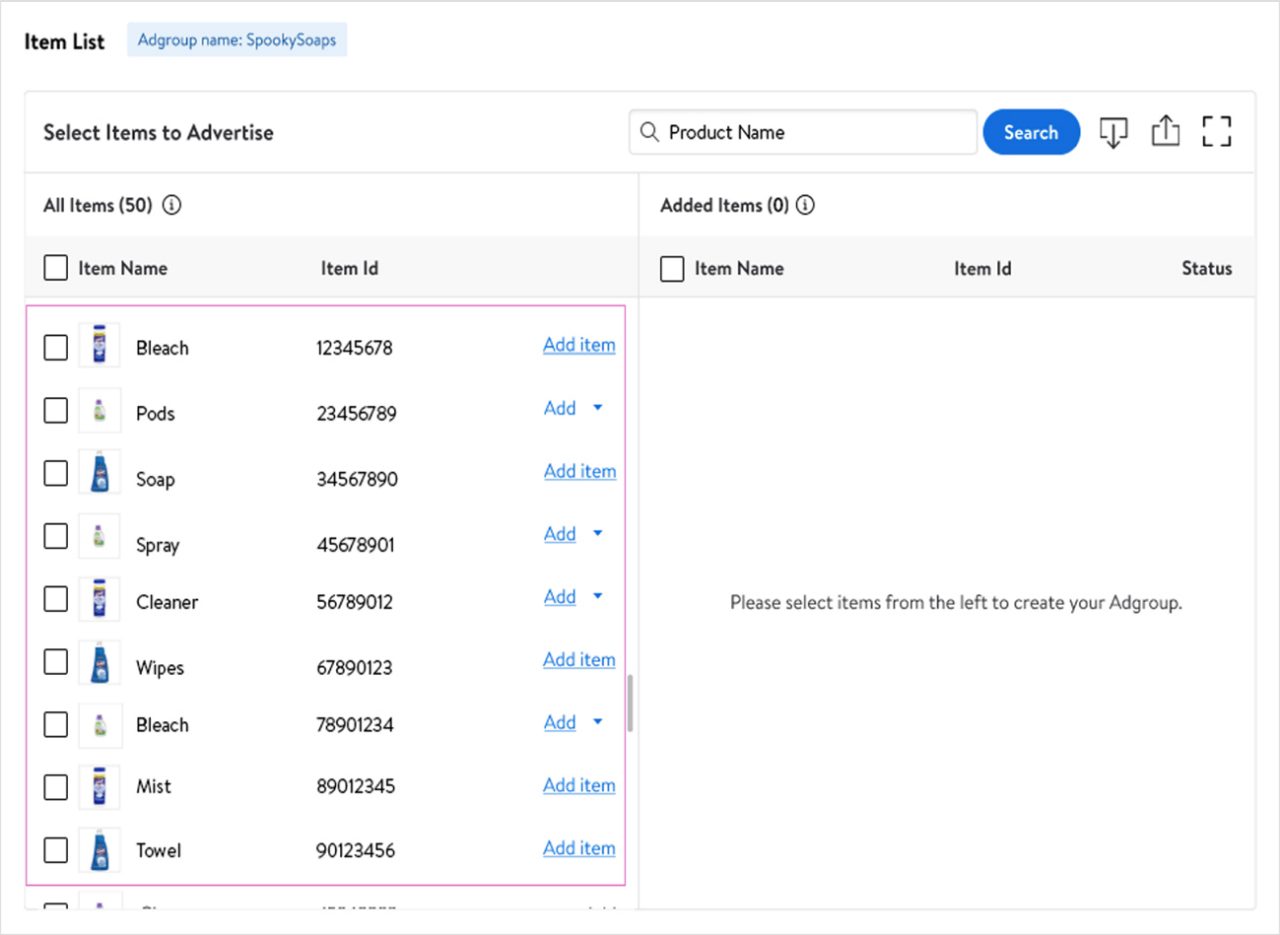
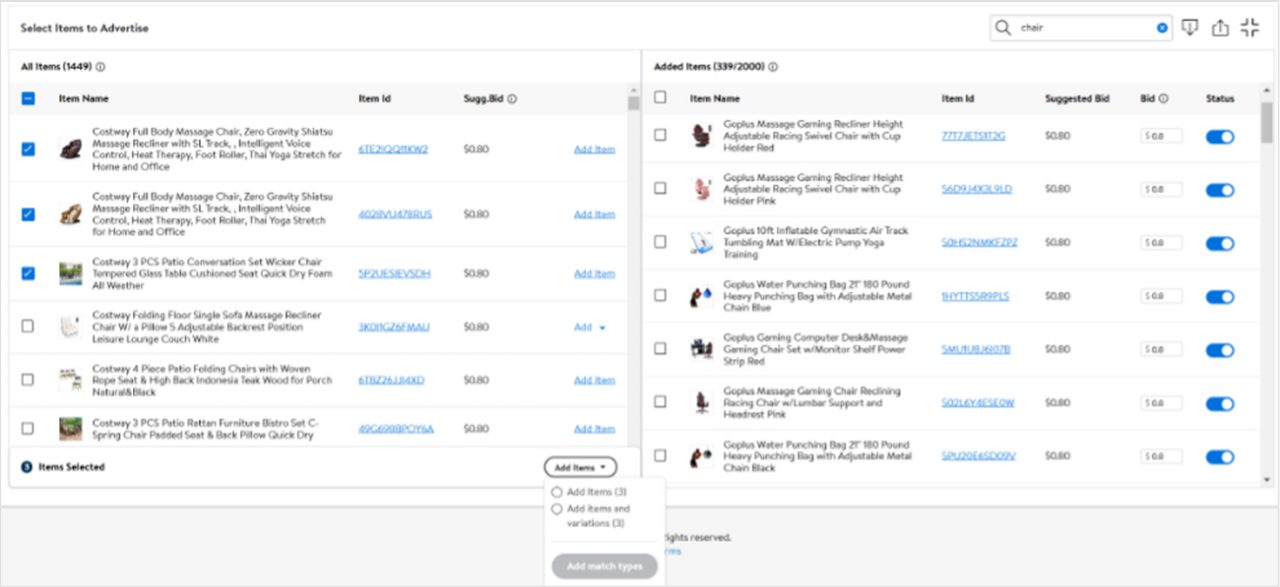
Step 4 (continued) — Add Items to an Ad Group
This article shows you how to add items to your Sponsored Products ad group and assign bid values to items in an Automatic campaign.
Adding items to your ad group
You can add items to your ad group in two different ways:
Upload a set of items in a CSV file.
OR
Search for items by item ID, product name, product keyword or brand name.
Note: You can now advertise all variant types that meet the eligibility criteria in your Sponsored Products campaign. See the Adding variants section for more details.
Adding a set of items in a CSV file
Download the CSV template using the Download icon in the top right corner of the Item List section.
Once you have downloaded the template, you will need to fill out these required fields:
- Item ID — Include your item IDs.
- Bid (Automatic campaigns only) — Place the bid amount you wish to bid on each item.
- Status — To enable an item, you can either enter "Enabled" or leave the field blank. If you wish to disable an item, enter "Disabled."
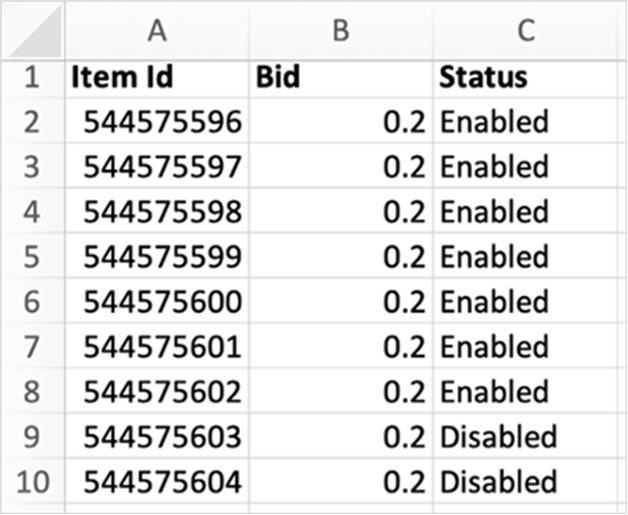
Notes:
- Bids cannot be more than $100 and no more than two decimal places.
- A maximum of 2,000 items are allowed per ad group.
Once you have filled out and saved your CSV file, use the Upload icon to upload your CSV file. The items/bids will be added to your ad group under Added Items.
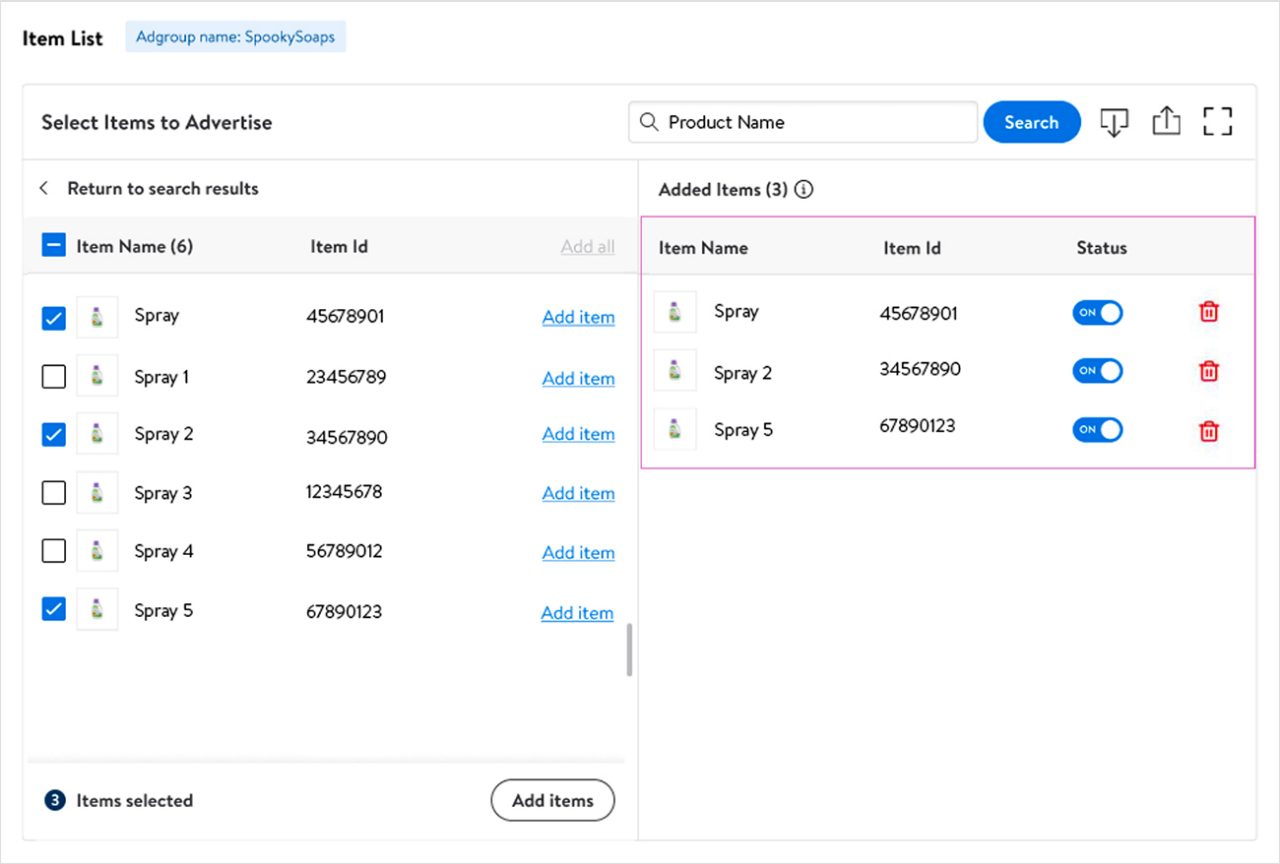
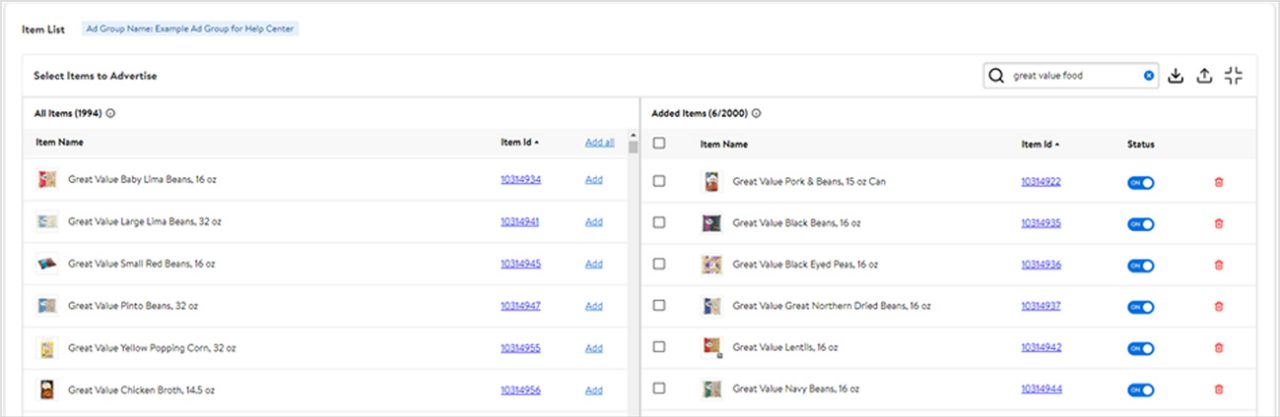
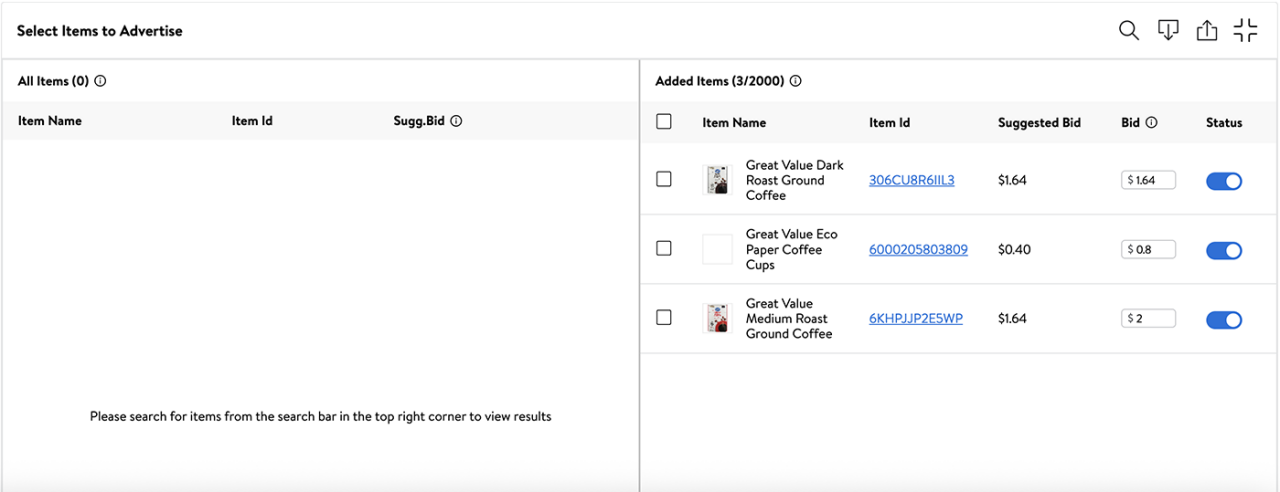
Adding items using the search field
Click the Search icon in the top right corner of the Item List section.
In the search field, enter the item ID(s), product name(s), product keyword(s) or brand name(s) of the item(s) you wish to promote.
Once the list populates, click Add to add the item(s) to your ad group. To select all, click Add All at the top of the column.
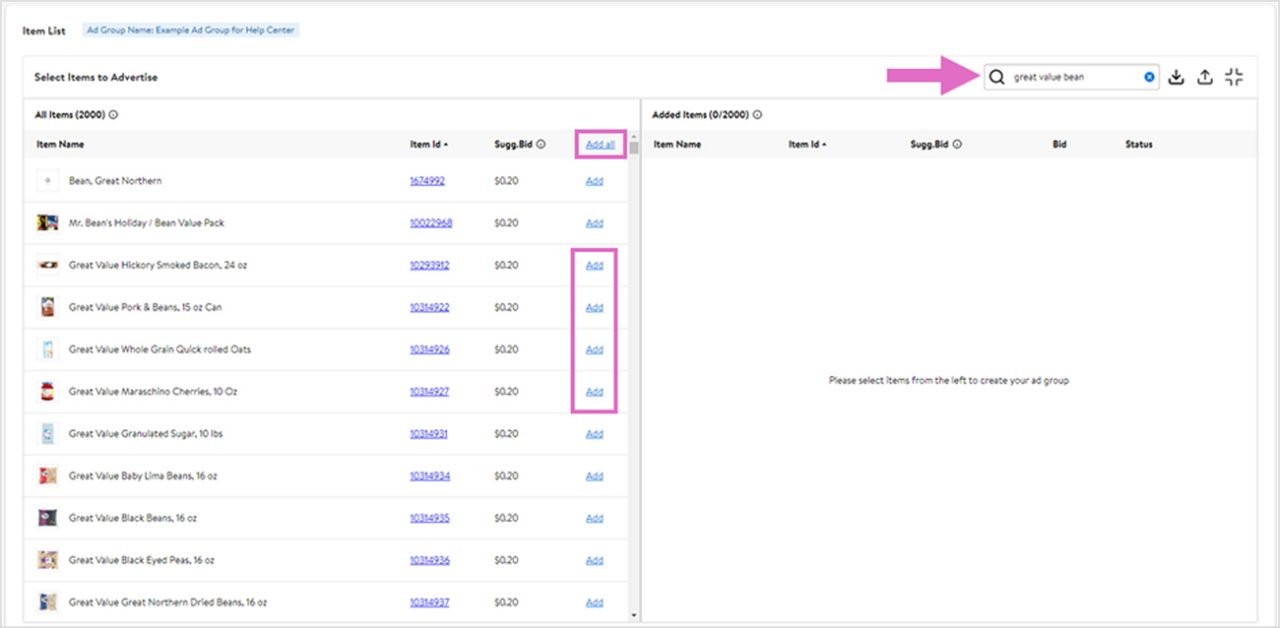
*For illustration purposes only. May not represent the bids available on the Canadian version of the platform.
The items/bids will be added to your ad group under Added Items.
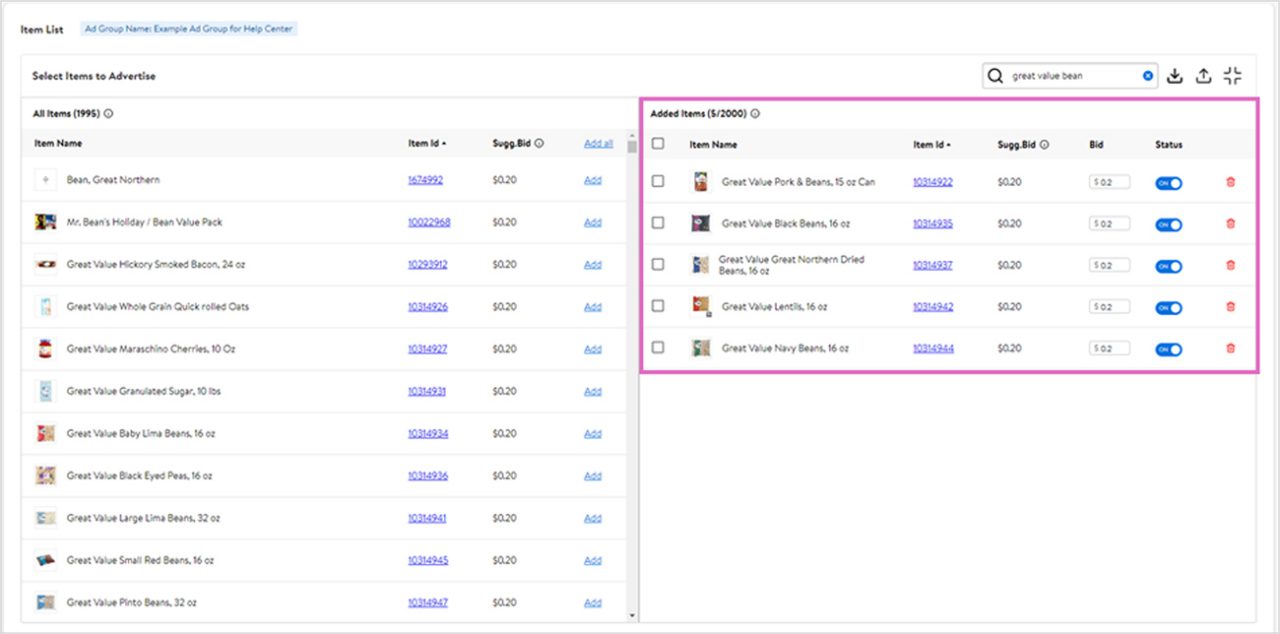
*For illustration purposes only. May not represent the bids available on the Canadian version of the platform.
Add variants to your campaign
First, choose a primary variant (formerly known as a base item) from the variants you wish to add to your campaign. Paste the ID number into the Search field and select Enter.
Once you press Enter, the primary variant will appear in the left pane.
After the primary variant appears, click Add to open the dropdown option.
From the dropdown, choose from three options: Add item, Add all variations and Add specific variations.
- Add item — Add your primary variant to the campaign.
- Add all variations — Add all variants of the primary variant to the campaign.
If you choose Add all variations, you’ll see all the variants added to your campaign. You can remove any variant by clicking the Delete icon. Once the campaign is live, you will not be able to remove items, you may only change the status to Off.
Note: Each variant will count towards the 2000 item maximum per ad group.
Updating items in your ad group
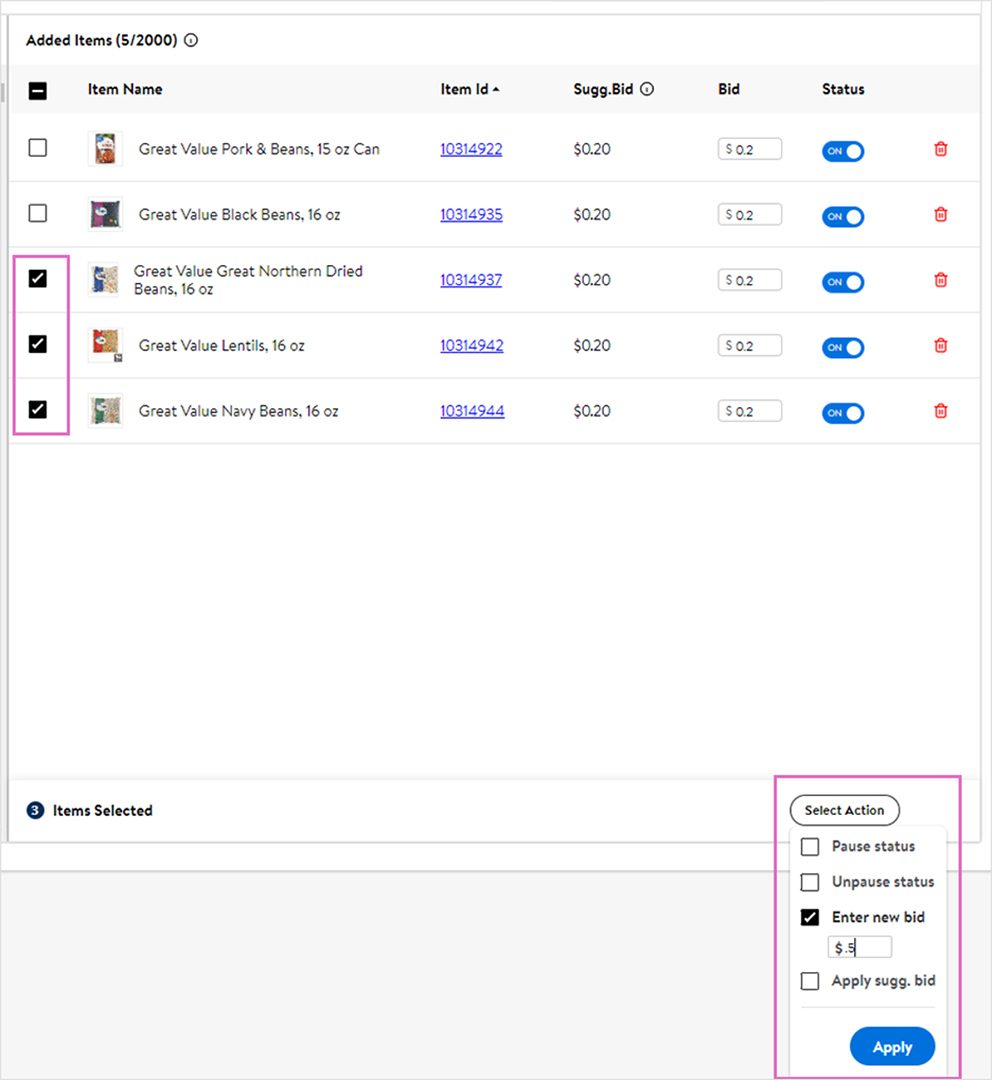
Once you’ve uploaded or selected the items you wish to promote, you’ll see all the items you have added to your ad group under Added Items.
You can enable/disable items and update bids.
*For illustration purposes only. May not represent the bids available on the Canadian version of the platform.
Searching for items in your ad group
Once the items have been added, you can use the search function to look for existing items and modify single or multiple items. You will be able to change bids, enable/disable or delete items (only if the campaign has not launched).
Use the following options to narrow your search results:
- By item ID — partial or full
- By name — single word or full name
Note: If you are creating a Manual campaign, the bid column will not be present. You will instead be assigning bid values to individual keywords and match types in the next section.
Launch campaigns with as many products as you can to discover which ones are driving the most results. Create detail-oriented campaigns—organize Ad Groups by product categories and SKUs (top-selling, low profitable, seasonal, and new). This can provide more control and higher visibility into product performance.
Setting up a manual campaign? Continue to Add and Select Keywords — Step 5.
Step 5 — Add and Select Keywords
This article explains how to select keywords, match types, and assign bids.
A note about match types
If you created a Manual campaign, the Keywords section is where you will be selecting and/or adding your own keywords and assigning bid values.
Note: As a best practice, we recommend grouping items with similar attributes when creating a keyword bidding campaign.
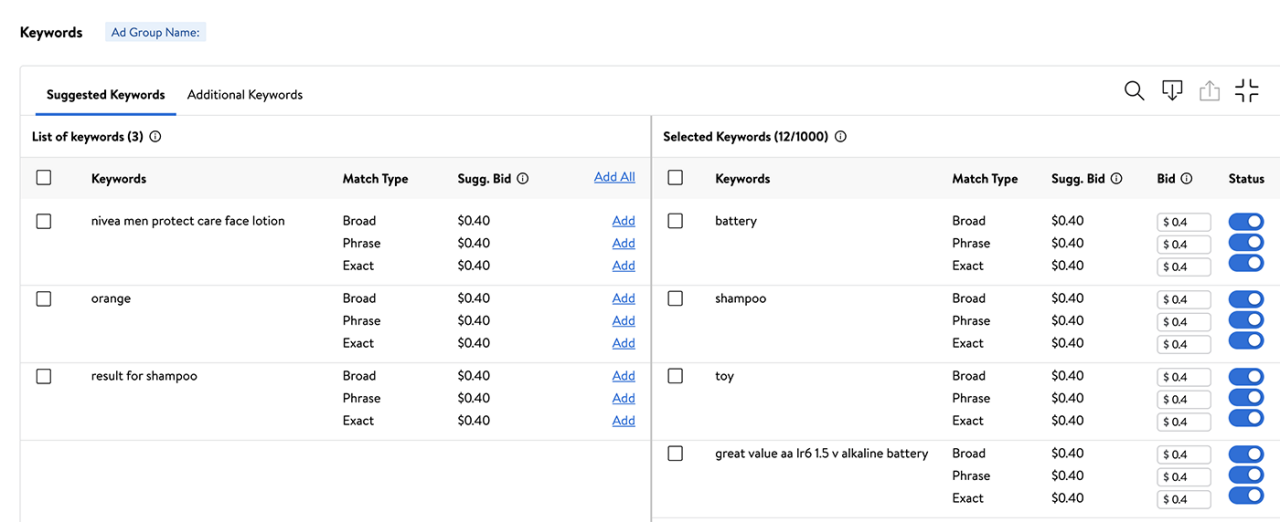
When bidding on keywords, you have three match type options to bid on:
For each match type, you can assign different bid values. Keep in mind that the bid value you have entered is the amount you are willing to spend for someone clicking on your ad.
Using Additional keywords
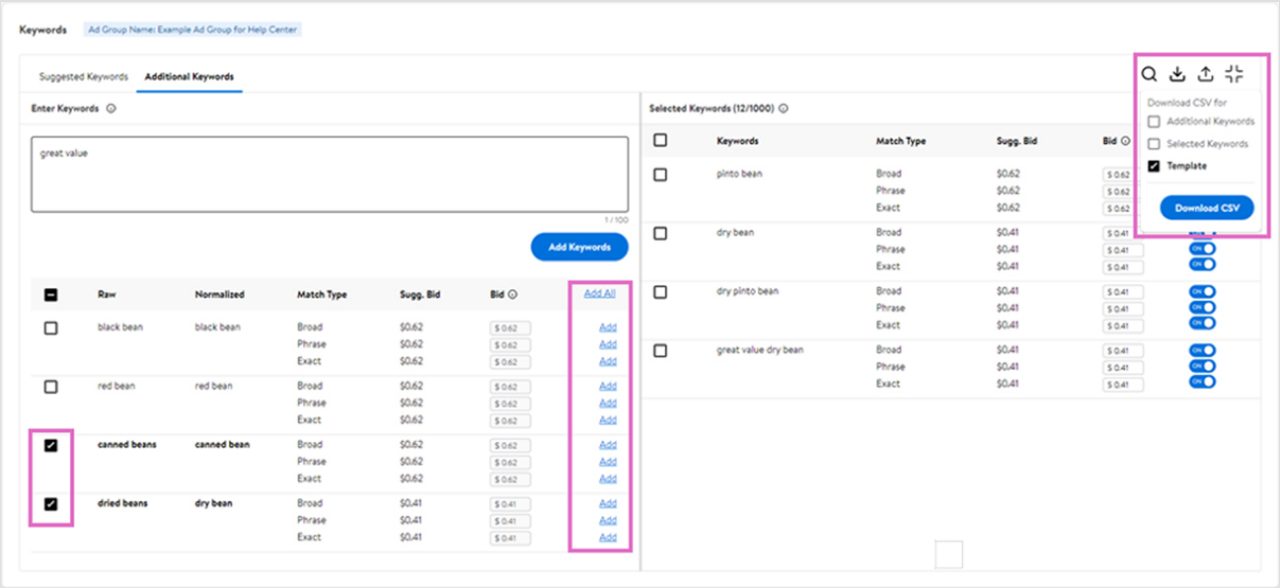
In the Additional Keywords tab, you can add your own keywords to target. Use this section to add and bid on keywords not mentioned in the Suggested Keywords section.
You can add additional keywords in two ways:
- Through the text box, using one keyword per line and up to 100 keywords at a time.
- Once you have added all your keywords, click on the Add Keywords button.
- Select the match types from the list below the text box and click Add to move to the Selected Keywords section.
OR
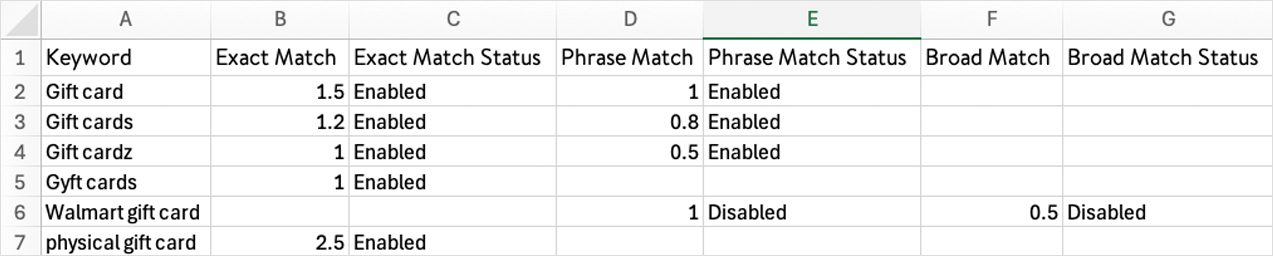
- Using a CSV file upload:
- First download the template by clicking the Download icon and selecting Template, then click the Download CSV button.
- In the template file, enter the keywords you want to bid on, and bid values for the match types you wish to target.
- If you wish to enable the keyword and match type, enter "Enabled" in the Status column or leave it blank. If you wish to disable a keyword and match type, enter "Disabled" in the Status column.
- Save your CSV file and click on the Upload icon and choose your file.
When using the Additional Keywords tab, there are a few other things to consider:
- 80 characters max per keyword (including spaces)
- Full string of special character keywords is not allowed
- Examples — #!%&@, $$$$$$
- Our system will convert all your keywords into normalized keywords
- For example, if you add "gift cards," "gift cardz," and "gyft cards," the keywords will be normalized to "gift card."
Note: If you used the CSV upload, the bid values you entered will already be applied. If you added multiple keywords that were normalized to the same keyword, we will select the highest bid value from each match type from all the raw keywords associated with the normalized keyword.
All added keywords, match types and bids are added to Selected Keywords.
In Selected Keywords, you can review and update the keywords you have added from both Suggested Keywords and Additional Keywords.
Note: A maximum of 1,000 keyword match type combinations are allowed per ad group.
To update a bid value, enter the new bid value in the text box under the Bid column. Use the Status toggle to enable or disable a keyword. The status of each added keyword is enabled by default.
- You can edit keywords in bulk by selecting the checkboxes and clicking Select actions.
- Choose Select actions from the dropdown menu to pause status, unpause status, enter new bid or apply suggested bid.
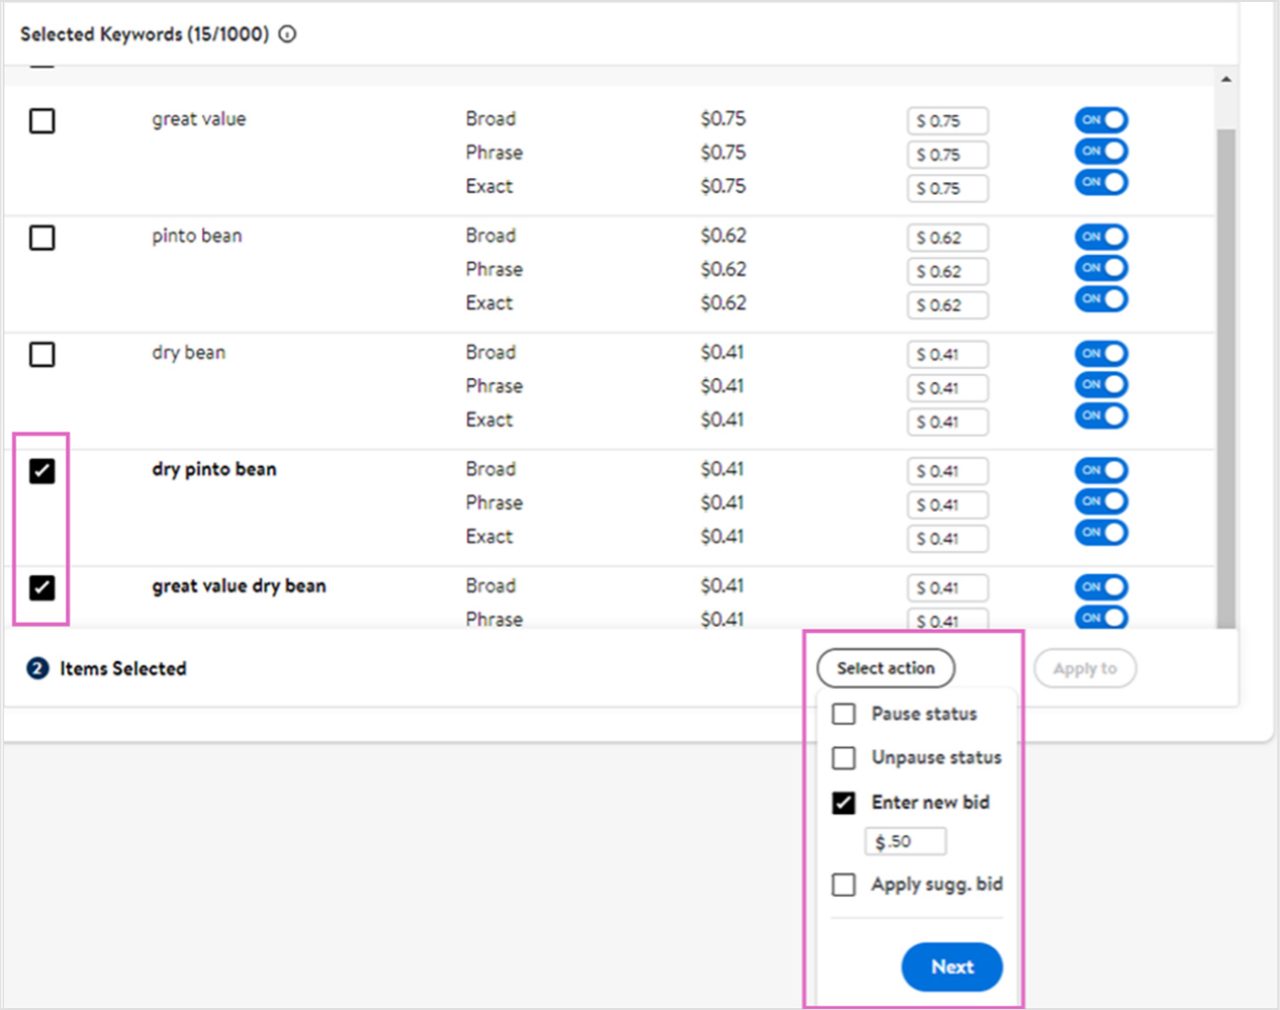
*For illustration purposes only. May not represent the bids available on the Canadian version of the platform.
- Click Next to select the match type(s) you wish to apply the bulk edit to, then click Apply changes.
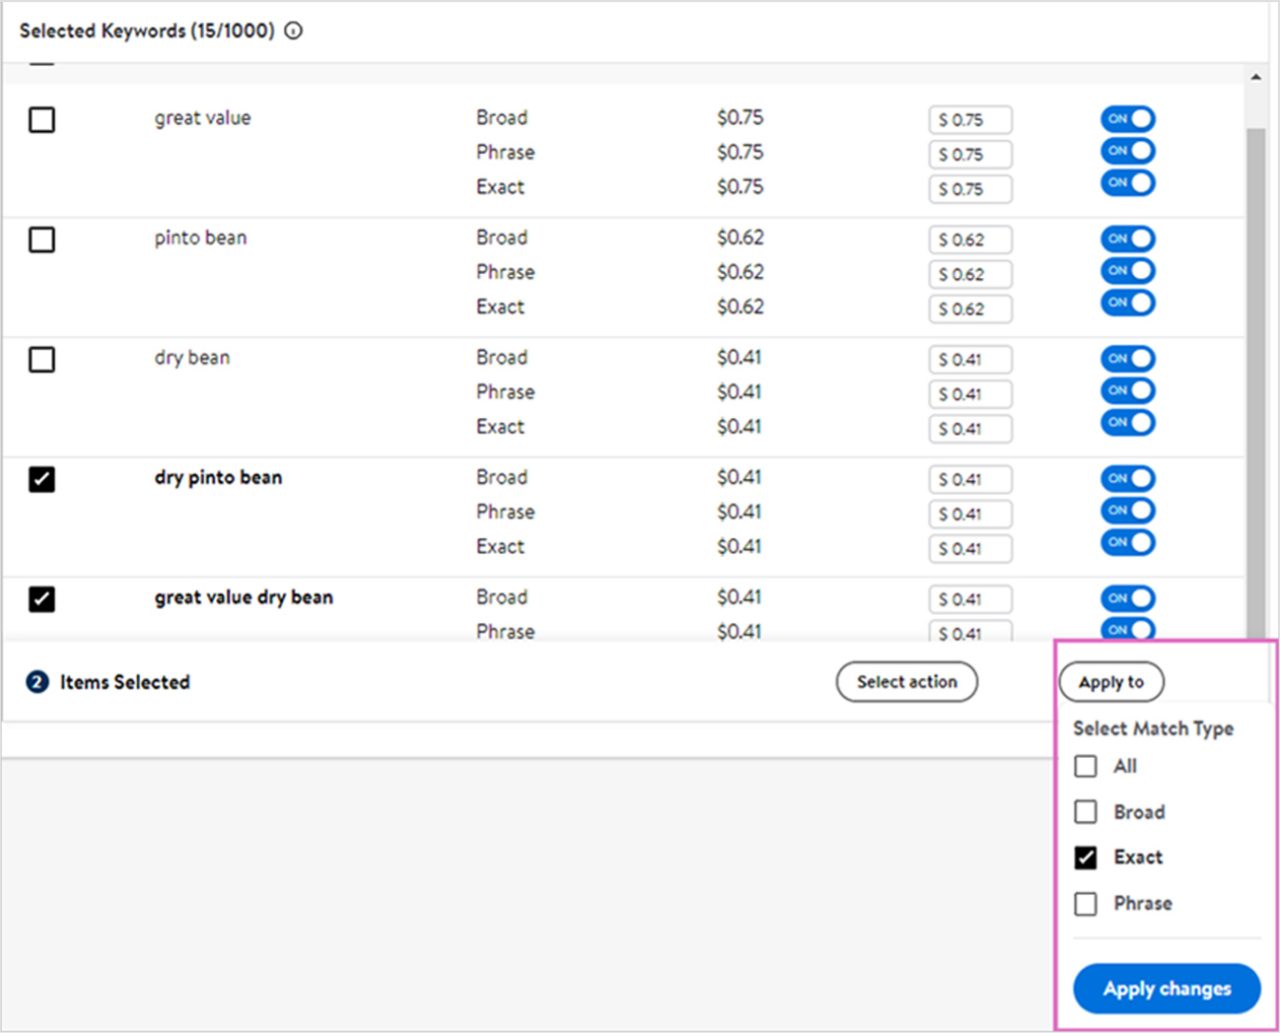
*For illustration purposes only. May not represent the bids available on the Canadian version of the platform.
Saving your ad group and starting your campaign
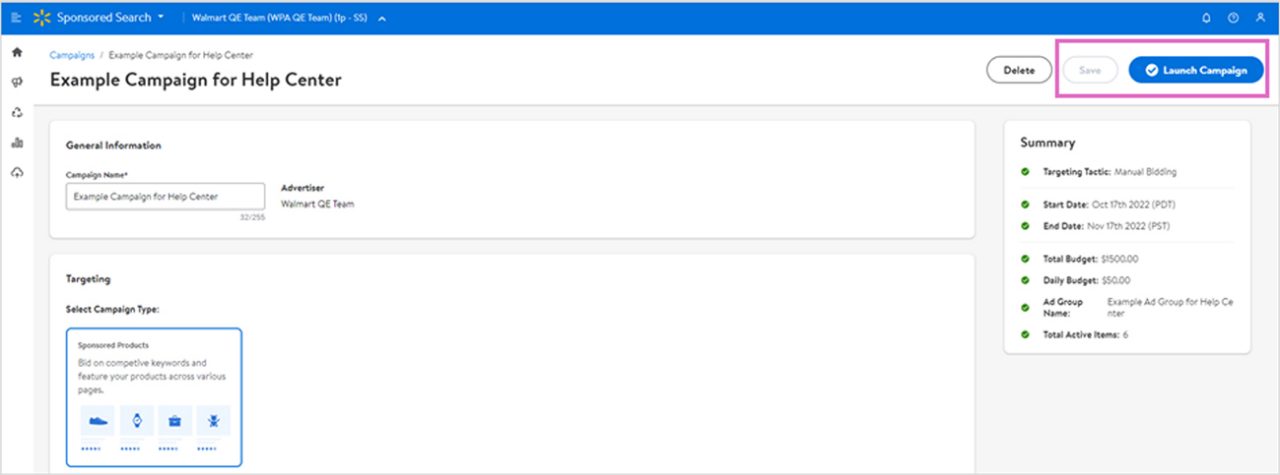
Once you have added all your keywords and adjusted all your bids, you will need to save your ad group by clicking on the Save button in the top right corner of the page.
Once you are satisfied with the setup of your campaign, click Launch Campaign.
Suggested Bids
This article provides an overview of suggested bids for automatic and manual campaigns.
What are suggested bids?
Suggested bids are automated bid-price recommendations provided to enhance the campaign management process by providing bid suggestions based on winning bids on similar ads and delivering more relevant impressions.
The recent enhancements to suggested bids help minimize bidding guesswork and can increase the chance of an advertisers’ ad being served. We’ve refined this feature to provide more granular automated bid-price recommendations based on winning bids for similar ads. These automated bid-price recommendations are offered at the product type level and at the keyword level for broad-, phrase- and exact-match keywords across all demand channels. Advertisers can gain competitive bid insights and compare their current bid to be more successful on our platform.
If you are unsure of what bid to start with for your campaign(s), we recommend using the suggested bid. This will aid you in delivering impressions compared to ads similar to yours.
How to get started
The suggested bids feature is available to all Sponsored Products and Sponsored Brands campaigns. Use the steps below to locate them within the Walmart Connect Ad Center.
For Automatic campaigns
For Automatic Sponsored Products campaigns, the suggested bid appears next to each item in the campaign.
*For illustration purposes only. May not represent the bids available on the Canadian version of the platform.
For Manual campaigns
For Manual Sponsored Products campaigns, the suggested bid appears under the Keywords section.
*For illustration purposes only. May not represent the bids available on the Canadian version of the platform.