Advertising Help Centre

Sponsored Products Guide

Showcase your product to millions of shoppers directly in their search results. This guide covers key topics for using our self-serve platform.

All Campaigns

This article provides an overview of the All Campaigns page including navigating, using, creating, editing or cloning, near-real time data vs. attributed data, and Out of Budget features. 

The All Campaigns page is found under Campaign Management in the left-hand navigation lets you access Sponsored Search advertisers, analyze, strategize and optimize multiple campaigns efficiently from a single page.   

Navigating to the All Campaigns section


This page enables you to: 

  • Analyze performance metrics visually across multiple Sponsored Search campaigns using the performance dashboard.  
  • Use the compare tool to identify trends across two date ranges.  
  • Personalize your data experience by picking the data points visible on the data table, customizing columns and downloading the view for offline analysis. 
  • Strategize using search, filter and sorting functions. 
  • Optimize individual campaigns, or use bulk actions to select up to 50 campaigns at once by applying pause/start, changing end dates, updating budgets, and applying suggested budgets for out-of-budget campaigns. 

Here’s a short video with an overview of All Campaigns:

Table of contents

The top of the All Campaigns page provides a performance dashboard that features performance and conversion metrics (up to three metrics are graphed at a time). Below the dashboard, All Campaigns lists 50 campaigns per page, but you can choose to view 100, 200 or 300 results per page.  

About the performance dashboard 

The All Campaigns performance dashboard helps you monitor and optimize your campaigns. It helps you: 

  • Get the big picture: See a quick, consolidated overview of your campaign's health with key metrics like ROAS, ad spend and total attributed sales displayed together for easy comparison.  
  • Dive deeper for insights: Visualize trends over time with interactive graphs, compare performance across different timeframes and attribution windows and unlock insights to optimize your campaigns and keywords. 
  • Optimize efficiency and performance: With clear data visualization, you'll can make informed decisions about budget allocation and keyword targeting, leading to significant performance improvements. 


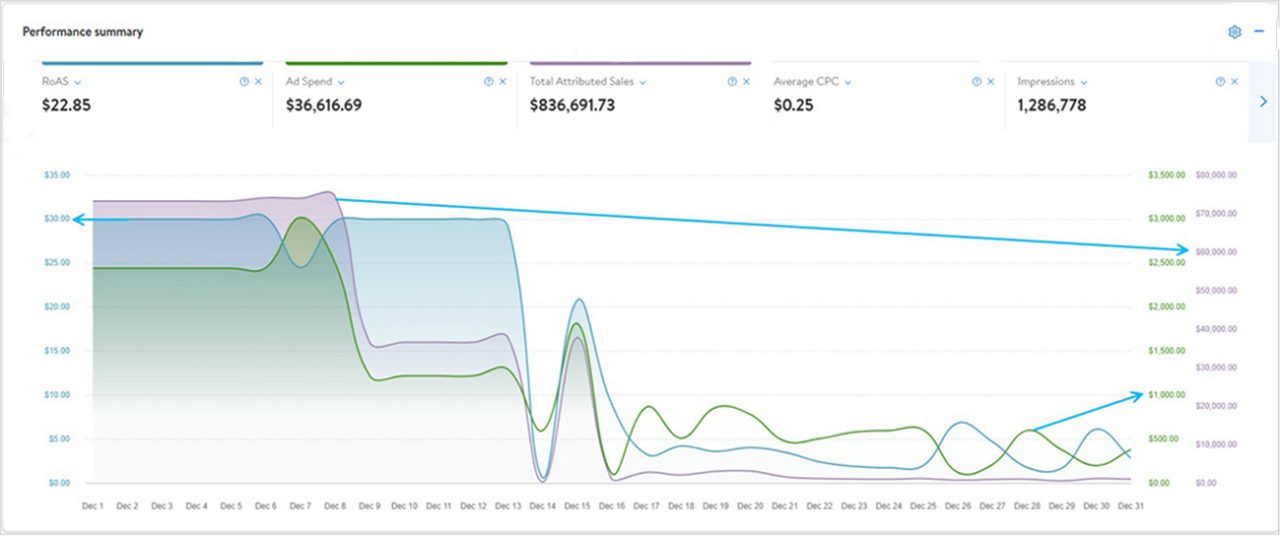
Summary view of the performance dashboard


Using the performance dashboard 

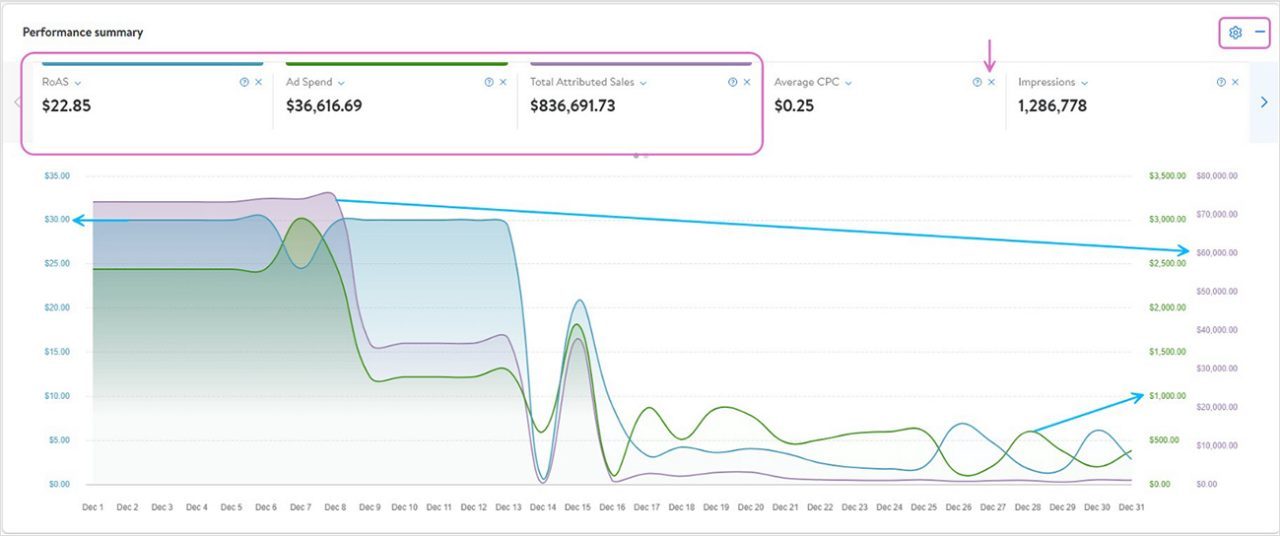
When Attributed data is selected, the performance dashboard shows, by default, the first three metrics: ROAS, ad spend and total attributed sales. You can easily switch between metrics by selecting them along the top. Up to three metrics can be displayed at a time, so if you select a new metric to display without deselecting one, the graph will automatically deselect a metric starting on the left. All performance and conversion metrics are available but can be easily removed by clicking on the X next to them or from the settings icon on the graph.  

Y-axis dimensions are color-coded along the left and right side of the graph to correspond to the color of the lines on the graph. The graph can be manipulated by selecting different date ranges, campaigns, attribution windows, campaign statuses and custom filters. Date ranges greater than one month are broken into weekly dimensions, and those greater than six months are broken into monthly dimensions along the x-axis. 

Highlighting key areas of the performance dashboard

Note: The performance dashboard is not available when near real time data is selected as the focus is on attributed metrics, which are not part of the near-real time view. 

Collapse the performance graph at any time to focus on the list of campaigns below it.  

About the data table 

The All Campaigns data table enables you to:  

  • Rearrange columns to meet your layout needs and have the platform automatically save those preferences for your next visit so you can focus on what matters and prioritize the data that is driving your goals.  
  • Analyze campaigns offline by downloading your custom view as a file for deeper analysis whenever you need to reference it. 
  • Perform bulk actions on up to 50 campaigns at a time. 
  • Get out-of-budget and budget-at-risk information and apply budget suggestions.
  • Compare between two date ranges to easily spot trends and make informed adjustments.
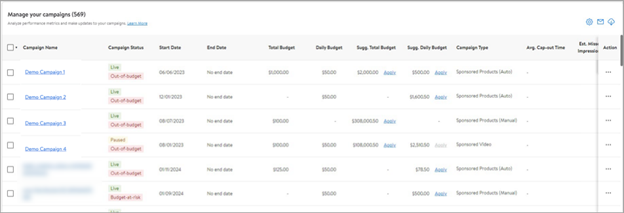
Data table overview


Using the data table  

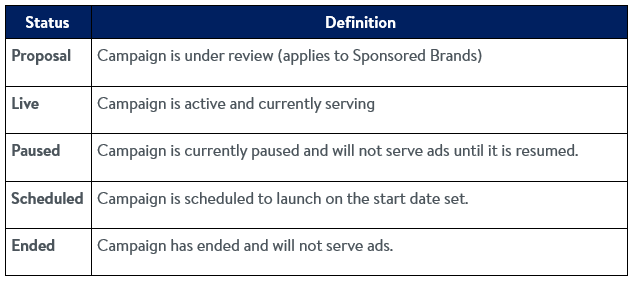
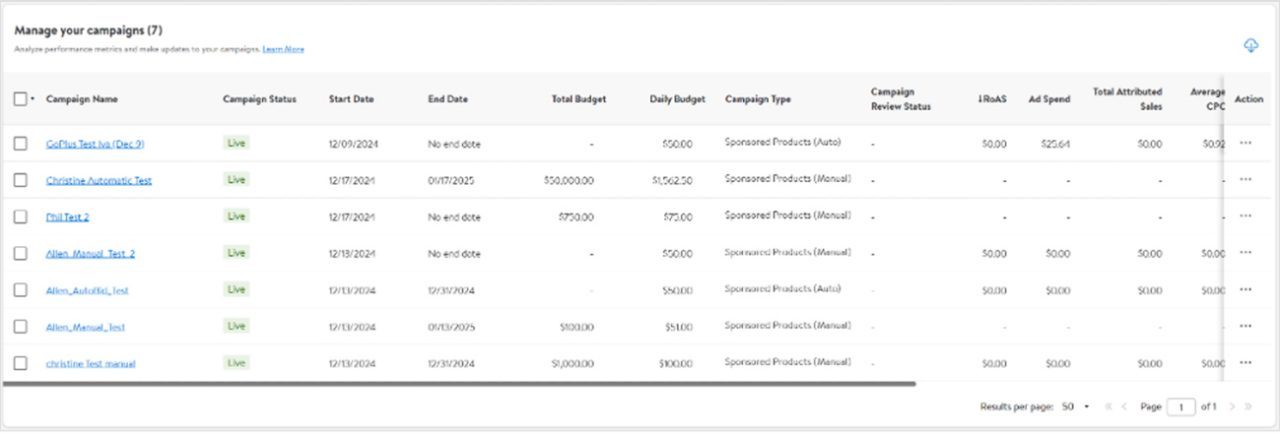
The All Campaigns data table shows all the campaigns associated with proposal, scheduled, live and paused campaigns.  You can choose to view ended campaigns by selecting that option in the status dropdown. 

Definitions of campaign status for All Campaigns tool

Note: You cannot edit campaigns that have ended in this view, but you can reactivate them and then edit them. 

The list details this key information: 

Types of campaign details available in the All Campaigns list


The first two columns (campaign name and status) and the action column are static to allow for a better horizontal scroll experience. The action column enables you to take specific actions on the selected campaign. 

Actions available in All Campaigns


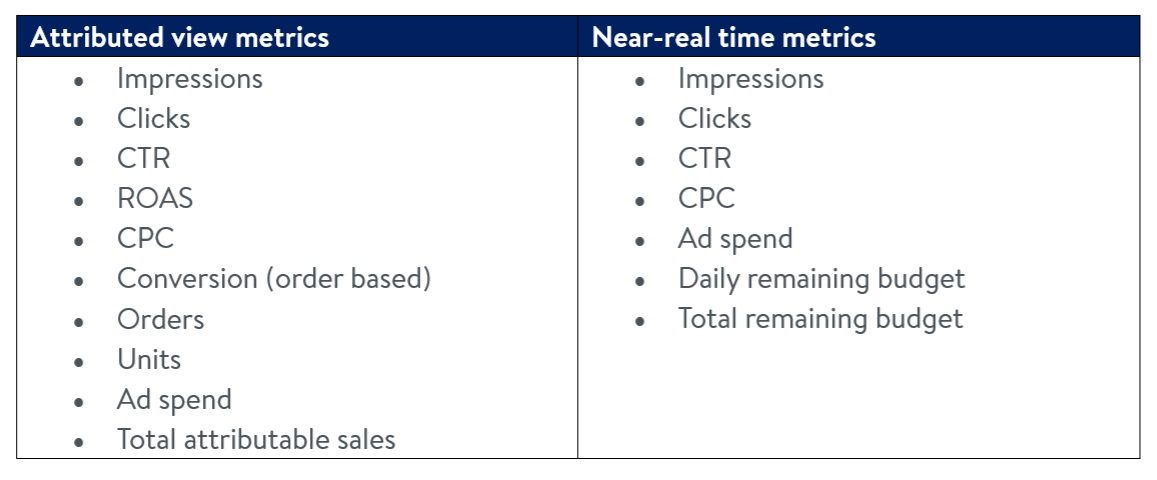
The list also details the performance and conversion metrics for the different data views:

Performance metrics available in All Campaigns


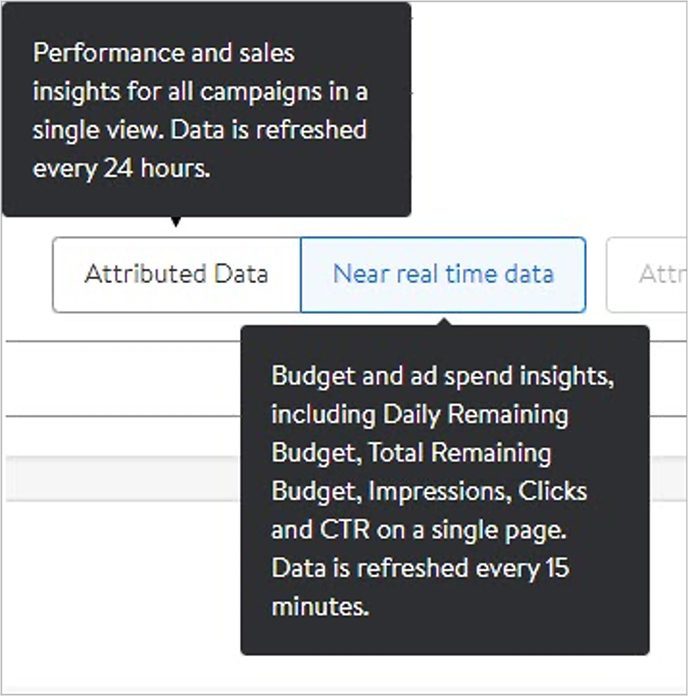
Near real time data shows metrics that do not require attribution, meaning they don’t require a certain amount of time to assign the data to the campaign. Attributed Data shows data that requires an attribution window, like sales metrics (ROAS, total attributed sales), so they do require a campaign to be live for a certain amount of time.   

Different timing views of data available


The default attribution window for conversion metrics is for the last 14 days, but both the attribution window and the date range can be changed using the attribution quick filter button found along the top. Change the attribution window from the default 14 days to three or 30 days and use the date range selector to pick a prepopulated range or customize it to suit your needs.  

Attribution window settings in All Campaigns


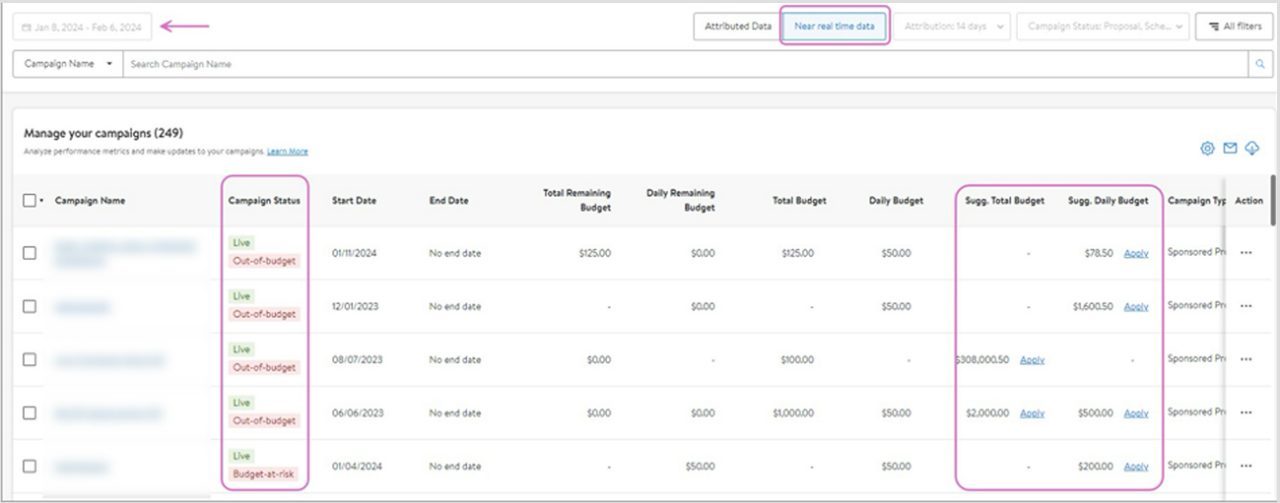
Select near real time data at the top of the table to see live campaigns and the remaining budget for them. This view allows you to easily identify campaigns that are over- or under-pacing and adjust the budget accordingly. The near real time data view only shows campaign data for the last seven days. This date range cannot be changed.  

Near real time data view

Note: You cannot edit start dates or choose campaign statuses in the near real time view. However, you can change the end date for live campaigns. 

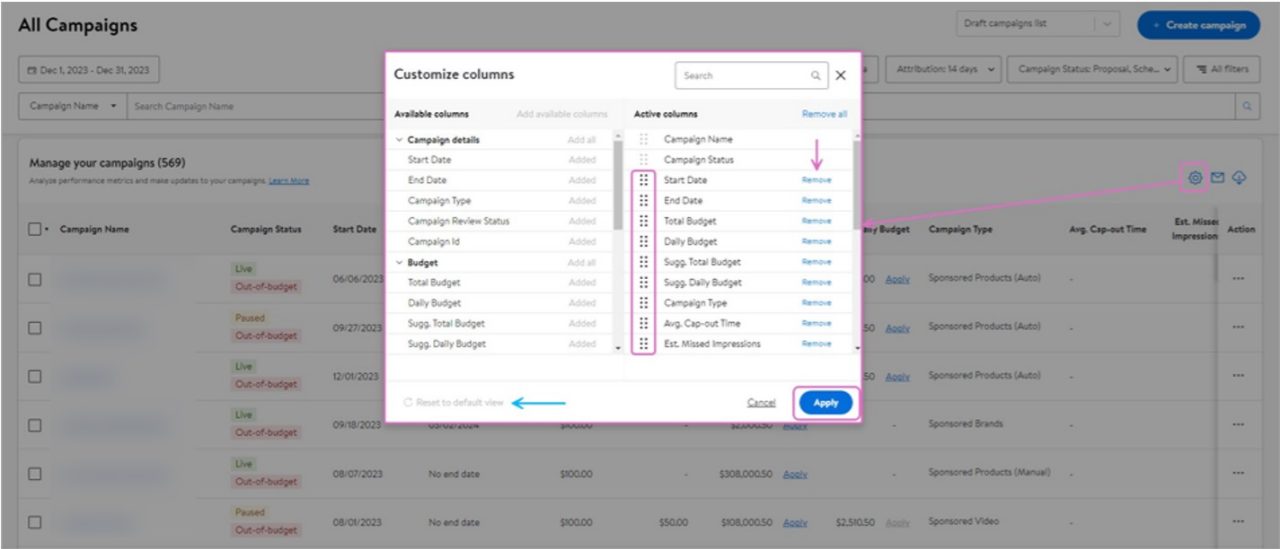
Columns can be customized from either data view to hide, show and reorder using the gear icon in the top right. All columns are shown by default but can be easily removed in the customization popup. Campaign name, ID and status and action columns are locked and cannot be removed.

Grab the column and move it up and down the list to reorder it. Campaign name, campaign status and action columns cannot be reordered.  

Experiment with different column arrangements to find the layout that works best for you. The column customizations you make to the list are saved automatically by the platform and will appear the next time you access All Campaigns. Columns can be reset to their default at any time. 

Choosing different column configurations


The list is searchable by campaign name or campaign ID. Select the option from the dropdown to the left of the text box and enter the details in the search text box.  
 
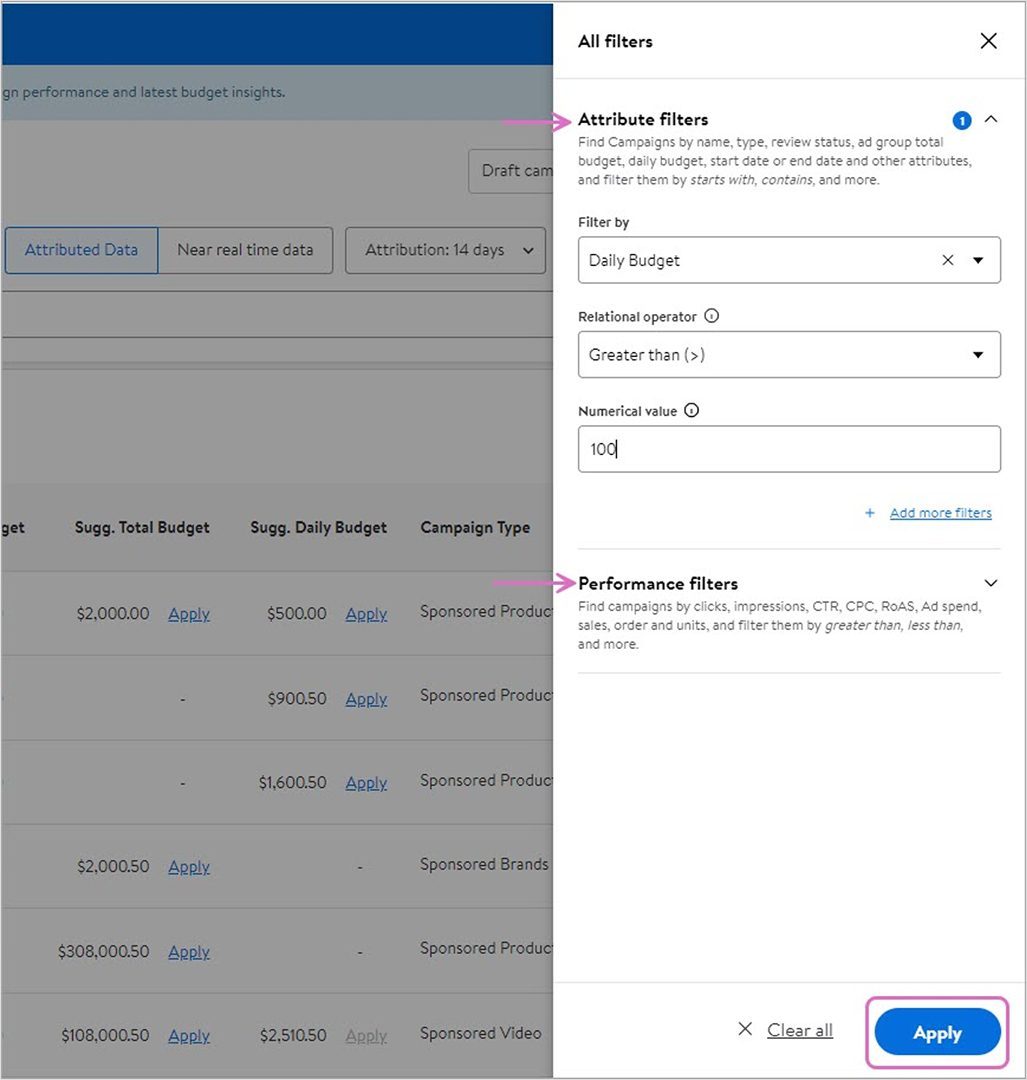
You can also apply advanced filters based on attribute and/or performance under All filters. Select All filters to open a window on the right. Select the attribute(s) you want to see and the option you want to filter by, and/or select the metric under the performance filter and enter scale and value. Values for metrics can include greater than (>), lesser than (<), equal to (=) or a combination. For example, if you wanted to find campaigns that were performing at or greater than a certain ROAS, you could filter for ROAS ≥ $x.xx.    

Using custom filters to sort campaigns

Note: There is no limit to the number of filters that can be applied, but filters cannot be saved at this time, so leaving or refreshing the All Campaigns page will result in filters resetting to the default.   
  

You can download the entire campaigns list or specific page view.  Download current view downloads the campaigns list directly to your computer. Download all results creates a downloadable report called Campaign Optimization in On-demand reports. For additional details on On-demand reports, click here.  

Actions you can take with All Campaigns 

Apply bulk actions 

The All Campaigns page empowers you to make individual and bulk updates to campaigns based on the information listed. You can apply bulk actions for up to 50 campaigns at a time.  
 
The checkboxes to the left of the campaigns enable bulk operations. Select the campaigns you want to update. A blue action bar appears above the list as soon as one or more checkboxes have been selected. You now have the option to:  

  • Enable or Pause campaigns  
  • Adjust end dates  
  • Adjust budgets  

 Note: When performing bulk operations, make sure you select the campaigns for which you want to perform the same operation (like adjusting a budget).    

If you are decreasing or increasing budgets, keep in mind the minimum thresholds for Sponsored Search. In case your budget reduces below the threshold for daily and/or total budget, the minimum thresholds will be automatically applied:  

  • The total budget must be at least $50 and the daily budget must be at least $50.   

 The platform will notify you if all selected campaigns have been updated as requested. If there is an issue, the platform will tell you how many campaigns produced an error and give you the option of downloading an error report.  

Increasing or decreasing campaign budgets in bulk


Create and edit campaigns 

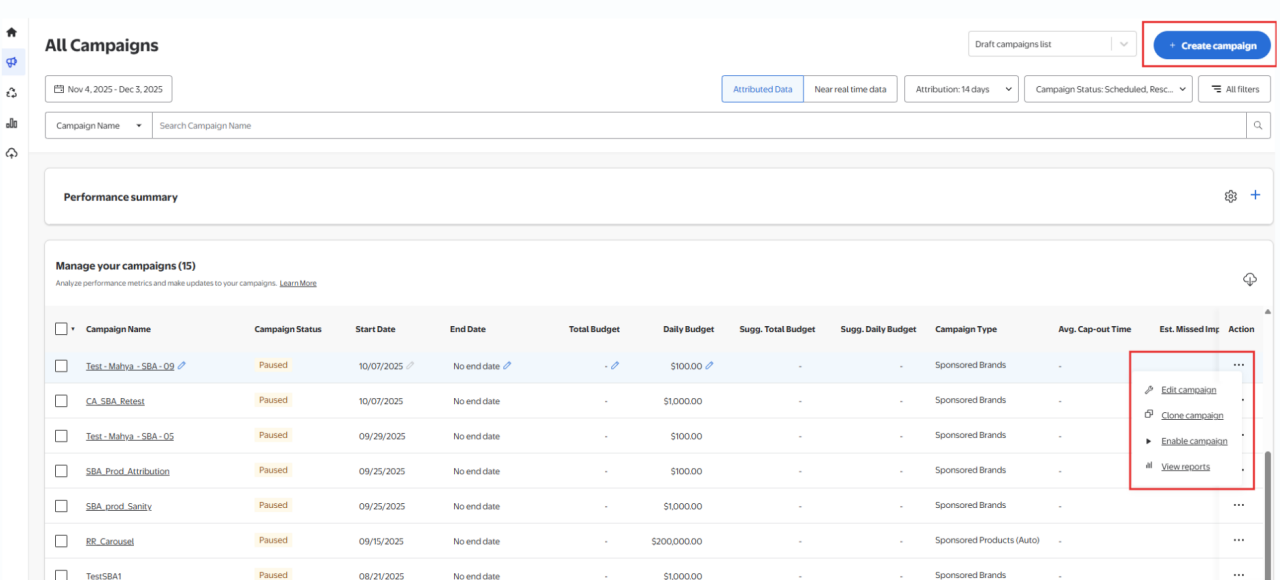
Click create campaign to create a new campaign.   
 
Any draft campaigns that were saved during setup, but not scheduled, are listed here under the Draft campaigns list dropdown menu. Clicking on any of the campaigns in the dropdown menu will open up the campaign creation page with all the saved information.

Under the Actions column, click on the three horizontal dots (•••) to the right of any campaign to edit, clone, pause or view campaign reports.   

  • Edit will open the campaign setup page where you can make campaign adjustments like another ad group or increase your daily budget.  
  • Clone will create a clone of your selected campaign and give you the option to rename and edit the campaign details before scheduling.  

Note: The ability to edit or clone a campaign is only visible to users with Admin or Write access. 

Editing or cloning a campaign


Monitor and update budgets  

The out-of-budget feature is accessible on the  All Campaigns page and the campaign creation and edit page for campaigns that are budget-at-risk or out-of-budget. These campaigns appear at the top of the list in the default view of the All Campaigns page and on the attributed data and near-real time data tabs.   

The out-of-budget and budget-at-risk feature enables you to: 

  • Identify missed opportunities and help prevent losses. The out-of-budget label instantly identifies campaigns that have run out of budget, while the budget-at-risk label identifies campaigns operating at suboptimal budget. The average cap-out time metric shows the time anticipated that your campaign will run out of budget.   
  • Make informed decisions regarding ad spend. Personalized recommendations on how to adjust budgets and avoid missing out on potential customers are provided.   
  • Apply recommended daily or total budget based on estimated missed opportunity impressions and clicks easily applied from the All Campaigns page. Recommended budgets can be applied individually or to multiple campaigns at once.   
  • Filter campaigns based on the average cap-out time metric and plan your daily spend pacing. to identify missed opportunities and helps prevent potential missed sales. You can view estimated missed impressions to help make an informed decision, and then use the data-driven recommendations of daily and total budget to quickly adjust.

You can filter campaigns under All filters by average cap-out time which appears in hourly intervals in the dropdown. 

Note: All filters does not include filters for out-of-budget and budget-at risk labels. 

Metrics available: 

Metrics available for filters


Out-of-budget metrics are updated once in a 24-hour period on the near real time tab and the Attributed tab. The other metrics on the Near-real time tab are still updated once every 15 minutes.   

Note: Average cap-out time will be blank for any campaign that hasn’t run out of budget at least once.   

When you take action on an out-of-budget or budget-at-risk campaign, the status and accompanying metrics will update on the Near-real-time tab first, causing a discrepancy with the out-of-budget metrics on the Attributed tab.  

Note: For ended campaigns, out-of-budget and budget-at-risk labels will be removed and campaigns will not be visible on the Near-real-time tab. 

Additional metrics supporting out-of-budget and budget-at-risk campaigns appear in the  Campaign Optimization report. You can sign up to receive email notifications when your campaigns run out of budget or are labeled as budget-at-risk.  

To change your email notifications preferences (opt-in or opt-out) for out-of-budget or budget-at-risk, use the email icon in the top right corner. Select either receive Out-of-budget email notifications or  Do not receive Out-of-budget email notifications and click change. 

When you take action on an out-of-budget or budget-at-risk campaign, the status and accompanying metrics will update on the Near-real-time tab first, causing a discrepancy with the out-of-budget metrics on the Attributed tab.   

Note: For ended campaigns, out-of-budget and budget-at-risk labels will be removed and campaigns will not be visible on the Near-real-time tab. 

Additional metrics supporting out-of-budget and budget-at-risk campaigns appear in the Campaign Optimization report. You can sign up to receive email notifications when your campaigns run out of budget or are labeled as budget-at-risk.  

To change your email notifications preferences (opt-in or opt-out) for out-of-budget or budget-at-risk, use the email icon in the top right corner. Select either receive Out-of-budget email notifications or  Do not receive Out-of-budget email notifications and click change. 

Note: All access levels (admin, write, read) can sign up for the email notifications.  

As soon as a campaign’s daily remaining budget and total remaining budget reaches zero, the campaign will receive an out-of-budget label. A campaign receives a budget-at-risk label when the daily budget associated with it has recently run out and the daily budget is still not updated to the recommended level. This label may imply that the campaign is operating at sub-optimal budget. Once the daily budget or total budget for the campaign is updated to a recommended level or higher, the budget-at-risk label goes away. 

Note: For paused campaigns, you will not see out-of-budget recommendations; our proprietary algorithm does not recognize paused campaigns. They will have recommendations up to the day they were paused.  

Out-of-budget scenarios 

I see budget recommendations for out-of-budget/budget-at risk campaigns in multiples of the current budget, even though I know my cap-out time is later in the day. 

This is because the daily budget recommendations that consider multiple factors such as day/time and seasonality, along with campaign performance and performance of similar campaigns are forward-looking.   

I do not see the recommended budget for my out-of-budget/budget-at-risk campaign with the daily remaining budget = zero after 24 hours.  

This is because your campaign may have a rollover budget that is still being spent. The recommendations will be provided once the rollover budget is also exhausted.   

I see a dash (-) in the daily remaining budget or total remaining budget for the Near-real time tab on the All Campaigns page for my out-of-budget/budget-at-risk campaigns.    

This implies the daily budget type is not applicable for that campaign. All the campaigns with a dash and/or zero will be sorted by campaign ID.   

I see a dash (-) in the daily budget or total budget of the Attributed tab on the All Campaigns page for my out-of-budget or budget-at-risk campaigns.  

This implies the daily budget type is not applicable for that campaign.   

I have both daily suggested and total suggested budget available for an out-of-budget campaign with both total and daily budget type, and I applied only the daily suggested budget, but I still see a campaign out-of-budget label in status.   

When you have both daily suggested and total suggested budget available, your daily and total remaining budgets are zero. If you update only the daily budget to the suggested daily budget your total remaining budget will still be zero, even though your daily remaining budget is greater than zero. This is because your campaign will not serve ads if the total remaining budget is equal to zero. To remove the out-of-budget label, you need to update the total budget so the total remaining budget value is greater than zero.    

I have both daily and total suggested budget available for an out-of-budget campaign with both total and daily budget type. I updated the daily suggested budget to a value less than the recommendation and now see the campaign labeled budget-at-risk.   

When you have both daily and total suggested budgets available, your daily and total remaining budgets are zero. If you update only the daily budget (to a value less than the provided recommendation), your total remaining budget will still be zero, even if your daily remaining budget is greater than zero. Campaigns will not serve when the total remaining budget is zero. To remove the Budget-at-risk label, you need to update the total budget so the total remaining budget value is greater than zero.   

I have both daily and total budget suggestions for an out-of-budget/budget-at-risk campaign with both total and daily budget type. I updated the total budget to the total suggested, but the out-of-budget label is still visible, and the daily remaining budget is still zero.  

When you have both daily and total suggested budgets available, your daily and total remaining budgets are zero. If you update only the total budget to the suggested budget, the campaign will not serve as the daily remaining budget is zero today and the daily budget will kick in the next day. The next day we should get a budget-at-risk label as daily remaining will be greater than zero and daily recommendation is not yet applied. If you apply daily suggested (or a greater value), the budget-at-risk label will get removed.   

Note: If you are making edits to a campaign that is scheduled to end the same day, you will be unable to save those edits. To save edits, extend the campaign’s end date by at least one day.    

Compare data across two timeframes 

Within the date range selector at the top left, you can enable the Compare feature which allows you to compare performance and conversion metrics between two different but of equal length timeframes. When enabled, Compare is applied to both the performance dashboard and the data table on All Campaigns. 

With Compare, you can: 

  • Analyze performance across different timeframes to see how your metrics have changed over time and identify trends or shifts in performance. 
  • Understand data changes with percentages from the data table and easily identify increases and decreases with color coding (green for increase, red for decrease). 
  • Get comparison suggestions based on your primary date range and attribution window, ensuring relevant data is always shown. 
  • Customize your comparisons by layering filters, selected metrics and attribution windows to see data represented both visually and numerically.  
  • See trends in both performance and conversion metrics to align to your campaign goals and objectives.  

Enable the Compare feature under the date range selector using the slider. Set the primary date range using the presets on the left of the custom date option, then set the dates you want to compare to under Comparison. Once you’ve set your primary dates, the platform will suggest a date range under the comparison range of equal length (number of days). Consider attribution windows when setting comparison date ranges. Your primary dates may not be long enough or looking back far enough to accommodate longer attribution windows. 

The performance dashboard will immediately update with two different sets of lines — one set solid, the other dotted. The solid lines represent the metrics for the primary date range, and the dotted lines represent the metrics for the comparison date ranges. Scroll over any line on the graph to see day-level breakdown comparison for the metrics on the graph and understand overlapping data.  


Remember that lines and dimensions are color-coded to help you easily identify and match metrics and to their values.  
 
The data table reflects the same comparison information in percentages. Scroll right to view metrics which have now been broken out into primary dates values, percentage change and comparison dates data. Green up arrows and red down arrows appear next to the percentage to clearly indicate if the percent change is an increase or decrease in value.  

Keep in mind that compare functionality includes both aggregated (e.g., clicks, impressions and total attributed sales) and averaged metrics (e.g., average CPC, ROAS and conversion rate).  

Reactivating an ended campaign 

All Campaigns allows you to easily reactivate ended campaigns.  

  • Locate the ended campaign(s) you want to reactivate.  
  • Click on the three horizontal dots (•••) under Actions. 
  • Select Reactivate campaign
  • Edit end date and budgets within the data table.  

You also have the option of opening the campaign directly by clicking on the campaign’s name and using the Reactivate campaign button in the upper right corner.  


Next article
Step 1: Create an automatic campaign

This article takes you through the first step in creating a new Sponsored Products campaign. You’ll also learn how to edit your budget and apply in-flight out-of-budget recommendations.