This article provides details on what bulk operations is, how it operates and how to execute it.
Advertising Help Centre
Sponsored Search Guide
Showcase your product to millions of shoppers directly in their search results. This guide covers key topics for using our self-serve platform.
Bulk operations
About bulk operations
Bulk operations provides streamlined campaign management, simplified bulk updates and the ability to make offline edits for complex tasks for your Sponsored Products campaigns.
Bulk operations enable you to:
- Create and update campaigns
- Create and modify ad groups
- Add, update and enable or disable items
- Add, update and enable or disable keywords
Benefits of bulk operations
Bulk operations is an advertiser’s power tool for managing large-scale campaigns and optimizing advertising performance.
Bulk operations empowers advertisers to create and manage campaigns efficiently and effectively by building a template with all your updates in it. This helps save you time and effort by handling complex tasks with ease.
Bulk operations assists in creating, updating and enabling or disabling campaigns, ad groups, items and keywords. This includes setting and updating budgets and bids, changing match types, setting and changing flight dates and adding ad groups using an Excel spreadsheet.
Easily download current or past campaign information into an editable Excel spreadsheet or start from a blank Excel template, then use up to 25,000 rows to create and update. Upload back into the Walmart Connect Ad Center and get detailed error feedback on any upload issues it encounters (if any). Utilize Walmart’s upload template with actionable step to prepare your bulk update sheet and address any errors identified in the feedback.
Note: Bulk operations can only be used on Sponsored Products campaigns within a single account.
How to use bulk operations
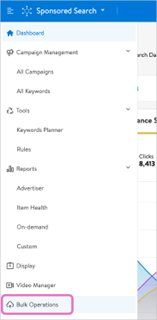
To access the bulk operations tool, select Bulk Operations from the navigation menu.
Update an existing campaign/ad group
Clicking Bulk Operations takes you to the Create files tab. Bulk operations gives you the option to download an Excel spreadsheet with existing campaign and ad group information or to start with a blank template.
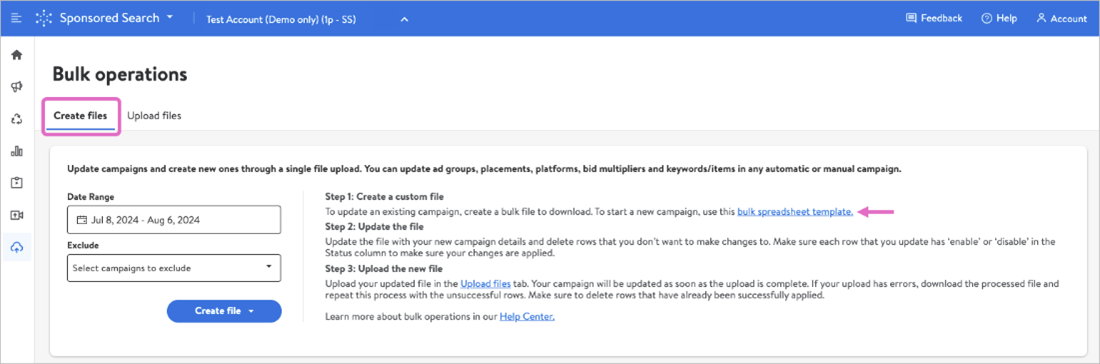
We recommend downloading campaign information if you want to update existing campaign and ad group content. This will allow you to quickly focus on what needs to be updated.
Note: For complex campaign structures with multiple ad groups, we recommend using separate files for each campaign. This ensures accurate targeting, avoids potential conflicts, and keeps uploaded files manageable.
Select your date range. You can use the predefined ranges from the right or select a custom range from the calendar. Optionally, choose which campaigns you want to exclude from the list. You can exclude currently ended campaigns and/or campaign items with zero impressions.
Date ranges are limited to a one month duration.
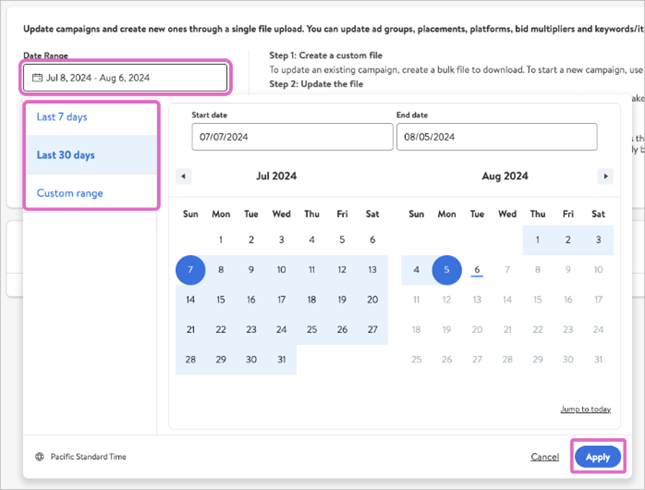
Click Create file then select between CSV or Excel (.xlsx) format. The Walmart Connect Ad Center will start to generate the file for download. The file will include all campaigns that meet your date range and exclusion preferences.
Download the file from the Created files list using the download icon. It may take several minutes for the list to generate, depending on the amount and size of the campaigns meeting your date range and exclusion preferences.
Open the downloaded Excel/CSV file. The file will have up to 25,000 populated rows. You can use this file to perform bulk operations on multiple Sponsored Products campaigns, so let’s examine the template’s columns.
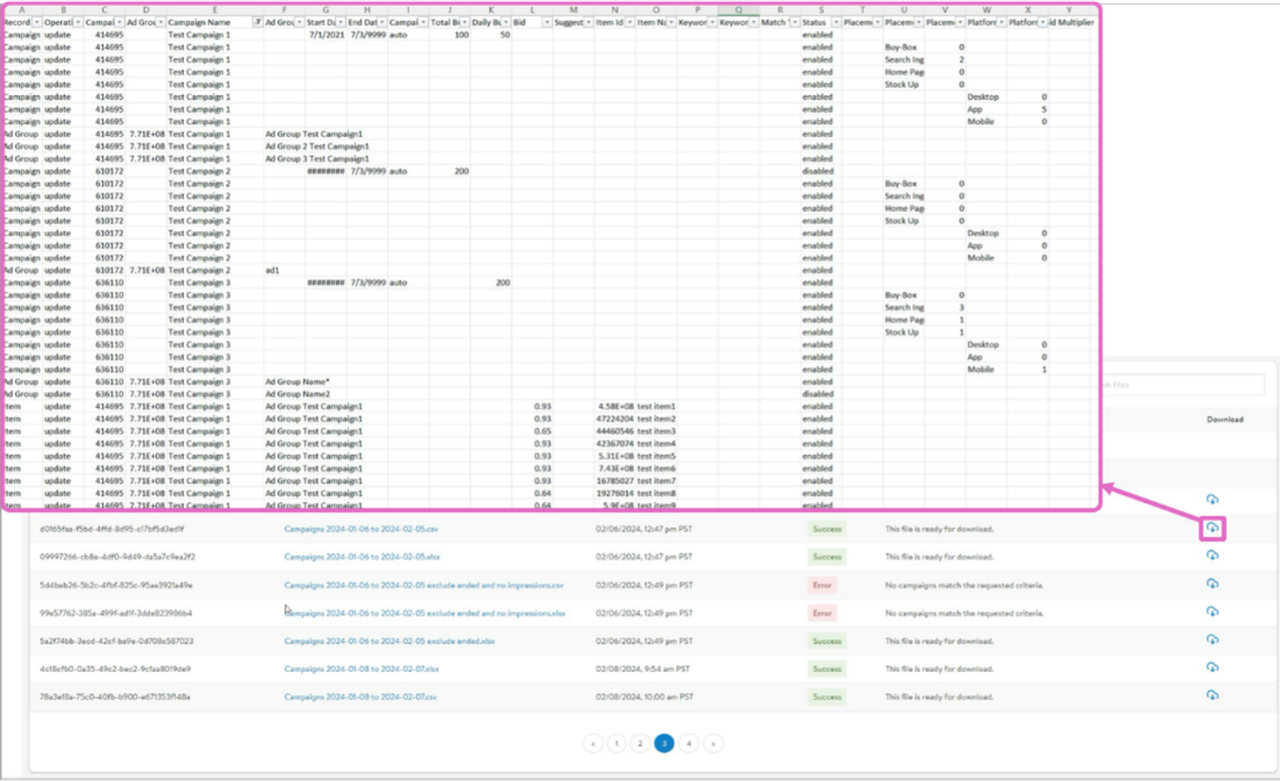
- Record Type — details the part of the Sponsored Products campaign you want to perform the action on (i.e., campaign, campaign placement bid multiplier, campaign platform bid multiplier, ad group, item, keyword, etc.)
- Operation — the action you wish to take on that record type; choose either create or update
- Campaign Id — unique campaign identifier provided by the platform
- Ad Group Id — unique ad group identifier provided by the platform
- Campaign Name — the name you gave the campaign
- Ad Group Name — the name you gave the ad group
- Start Date — campaign’s start date
- End Date — campaign’s end date (will be blank if the campaign is set to run indefinitely)
- Campaign Targeting Type — campaign’s chosen targeting type, either manual or automatic
- Total Budget — campaign’s total budget
- Daily Budget — campaign’s daily budget
- Bid — bid amount set at the item or keyword level
- Suggested Bid — suggested bid for item or keyword
- Item Id — unique item identifier provided by the platform
- Item Name — item’s name from catalog
- Keyword — keyword or phrase matching the item
- Keyword Id — unique item identifier provided by the platform
- Match Type — keyword match type (i.e., exact, phrase or broad)
- Status — status of the record type, choose either enable or disable
- Placement Inclusion Type — the placement(s) selected for the campaign (this only applies to manual campaigns)
- Placement Bid Multiplier Type — the placement(s) with a bid multiplier applied
- Placement Bid Multiplier — bid multiplier percentage on that placement
- Platform Bid Multiplier Type — the platform(s) with a bid multiplier applied
- Platform Bid Multiplier — bid multiplier percentage on that platform
If your Excel file is particularly long, we recommend applying filters to the columns to quickly filter and sort for the rows you want to update. Since you need to delete the rows you don’t want to change, we also recommend removing the default entry under Operation (default is update from download) to help track which rows you are changing.

Note: If you want to update budgets, filter by Campaign record type.
Apply the updates to the rows you want to manage. Make sure you update the columns that match the record type you are updating.
Note: Special characters like quotes (") and commas (,) can cause parsing issues. Ensure these characters are properly escaped within your file to avoid errors. The Bulk Update Resource provides guidance on proper escape methods. Wildcard characters like asterisks (*) are technically accepted, but have the potential to cause errors, so their use is discouraged.
For example, if you want to update the bid multiplier amount on a placement, try this:
- Filter for the Campaign Placement Bid Multiplier record type.
- Enter update under Operation.
- Set Status to either enabled or disabled.
- Locate the placement under Placement Bid Multiplier Type (i.e., Buy Box).
Note: For manual campaigns, options for placement bid multipliers are Search Ingrid and Item Buybox. For automatic campaigns, options for placement bid multipliers are Search Ingrid, Item Buybox, Homepage and Stock Up.
- Change the amount under Placement Bid Multiplier. Remember that bid multiplier amounts are percentages, though the percent (%) sign should not be included in your amount in the bulk operations file.
- Remove the rows you didn’t update. If you removed the default value under Operation as recommended, simply filter for the rows with blank value.
- Clear all filters you applied and save your Excel file.

In addition to updating existing record types, you can create new campaigns and ad groups and add items, keywords, placement inclusion and bid multipliers. Creating and adding can be done in the same Excel spreadsheet as updates or in a blank bulk operations template.
- Open the downloaded Excel/CSV template.
- Start a new row and enter record type.
Your record type options are:
Ad group | Campaign placement inclusion
|
3. Enter create under Operation.
- Note: Wildcard characters like asterisks (*) are technically accepted, but have the potential to cause errors, so their use is discouraged.
4. Leave Campaign ID blank if you are creating a new campaign. If you are creating a new ad group, leave Ad Group Id blank. Fill them in if you are adding to an existing campaign and/or ad group.
5. Enter the campaign name and/or ad group name. Both are required if you are adding items and/or keywords.
6. Enter the start date for your new campaign. The end date is optional. If you choose to leave the end date blank, the campaign will default to run indefinitely.
- Note: Dates are only needed for creating new campaigns.
7. Enter your Campaign Targeting Type: automatic or manual, and your Total Budget and/or Daily Budget. These columns are only required for new campaigns.
- Note: Only one budget type is required to create a campaign, though having both is recommended.
8. Set status to enabled.
9. Columns L, N, O, P Q, R, T, U, V, W and X are dependent on record type and should be completed the following ways:
For new items
- Enter bid, item ID and item name.
For new keywords
- Enter bid, keyword/phrase and match type.
Note: If you want different match types for the same keyword (i.e., broad and phrase), you’ll need a separate entry/row for each match type. Keyword IDs are generated by the Walmart Connect Ad Center. You do not need to include one for new keywords.
For adding placement inclusion (manual campaigns only)
- Enter the placement you want enabled under Placement Inclusion Type. Your options are Item Carousel, Item Buybox and Search Carousel. Search Ingrid is enabled by default and cannot be disabled.
For adding bid multipliers
- Enter the placement under Placement Bid Multiplier Type or the platform under Platform Bid Multiplier Type. For manual campaigns, options for placement bid multipliers are Search Ingrid and Item Buybox. For automatic campaigns, options for placement bid multipliers are Search Ingrid, Item Buybox, Homepage and Stock Up. Options for platform bid multipliers are desktop, app and/or mobile and are the same, regardless of campaign targeting type.
- Note: Make sure the record type of the row matches the columns you are using.
- Enter your percentage under either Placement Bid Multiplier or Platform Bid Multiplier, depending on the record type. Enter whole numbers without the percent (%) sign.
10. Save your bulk operations file. You’re now ready to upload it into the Walmart Connect Ad Center.

You can create an entirely new campaign without having a campaign ID or ad group ID by entering these record types in this exact order:
- Campaign
- Campaign Placement Bid Multiplier (optional)
- Campaign Platform Bid Multiplier (optional)
- Campaign Placement Inclusion (optional)
- Ad Group
- Item
- Keyword
Upload a bulk file
When you’re ready to upload your bulk operations file, select the Upload files tab. Drag and drop or use the browse to select files button to start your upload. Uploading is automatic after selection. Scheduling bulk operations is not an option at this time. File size is limited to 25 MB or less. If your file is larger than that, consider splitting it into two or more files.
Uploads can take up to four hours to complete, depending on the length and complexity of your requests. Status of your upload can be tracked under Your uploads.
Note: You can’t make changes to your bulk operations file once upload has started. Additional changes will need a new uploaded file.
Status options under Your uploads:
- Uploaded — file was successfully uploaded but requested changes are pending
- Partial success — some of the changes you requested were made; some failed
- Success — all requested changes have been made successfully
- Error — none of the requested changes were made successfully
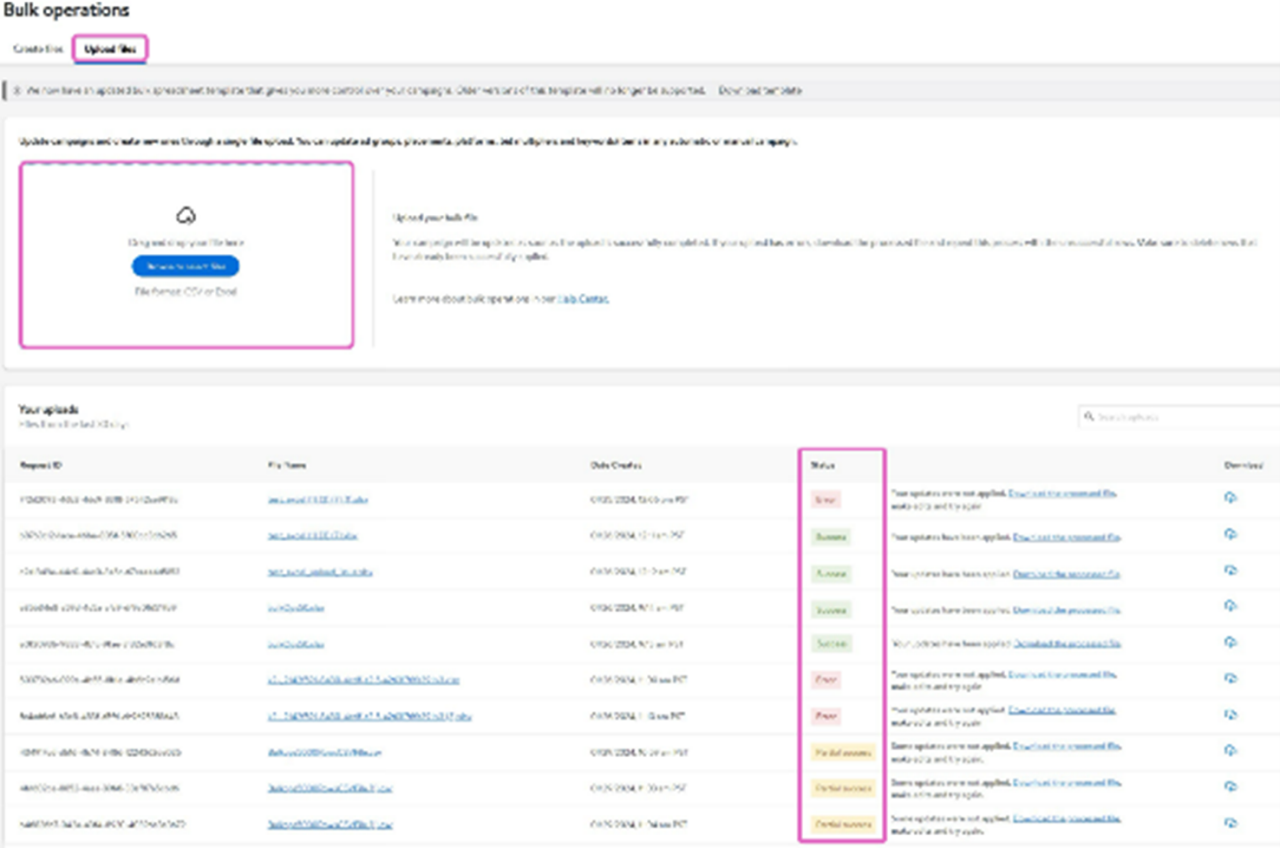
For uploads that are partially successful or errored out, you can download a feedback file to get a detailed report on why the requested operations failed. Rows without changes or rows deleted from the Excel spreadsheet prior to upload remain unchanged.
Note: You cannot cancel changes you made, so if you made a change you want to undo, create a new version of the bulk operations file with the update reverted.
Use the Bulk Update Resource for guidance on preparing your bulk operations sheet and decoding error codes identified in the feedback file.

Note: The feedback sheet currently doesn't include feedback on normalized keywords. You can get around this by downloading a bulk operations file for your newly added keywords.
Best practices
To ensure smooth upload and processing, follow these best practices:
- Use the latest version of the Bulk Update template provided by Walmart or download your account information from the Download tab.
- Evaluate your data for accuracy and consistency before uploading.
- Double check for formatting issues and special characters.
- Test your upload with a small sample file before processing large data sets.
- Refer to the Bulk Update Resource for detailed instructions and troubleshooting tips.
Several advanced techniques can further enhance the effectiveness of your bulk operations, such as:
- Using data from formulas. While not directly supported, you can leverage formulas in external spreadsheets to pre-process your data before importing it into the Bulk Update template.
- Version control. Implementing version control for your bulk update files helps track changes, identify issues and revert to previous versions if necessary.
Optimize your workflows for efficiency by:
- Planning your bulk updates. Clearly define your goals and desired outcomes before preparing your bulk update file.
- Testing and iterating. Start with small test files and iterate based on feedback to refine your update process.
- Monitoring performance. Regularly monitor the performance of your campaigns after bulk updates to identify any unintended consequences and adjust your strategies accordingly.
- Double check your work. Reviewing your changes for accuracy can reduce the need for any re-uploads, and changes from errors during the upload process